Project Summary
This Proxmox project documents the setup and management of a virtualization lab used to deploy servers, containers, isolated networks, and cybersecurity training environments. It covers the core work needed to build a practical home lab platform for testing systems, networking, backups, clustering, and GPU passthrough.
- Proxmox installation, storage cleanup, ISO upload, and VM/container deployment.
- Network bridge configuration for additional interfaces and isolated lab segments.
- NVIDIA GPU passthrough setup for Kali and Windows virtual machines.
- Backup and restore workflows using external USB storage.
- Multi-node cluster setup and VM configuration recovery.
- Cybersecurity lab builds with Kali, Windows, and pfSense internal networks.
Quick Navigation
- 1. Project Summary
- 2. Adventures in Proxmox
- 3. Proxmox Web Setup
- 4. NVIDIA GPU Passthrough
- 5. NVIDIA Driver for Kali
- 6. Terminal qm Activation
- 7. Adding Second Hard Drive & ISOs
- 8. Adding Ethernet Interfaces
- 9. Backup VM Workflows
- 10. Restore VM Workflows
- 11. Multi-Node Cluster Setup
- 12. Isolated Lab Network Setup
- 13. pfSense Cybersecurity Lab
Virtualize This! Adventures in the World of Proxmox
Proxmox is a powerful open-source platform for virtualization and container management, designed to deploy, manage, and monitor virtual machines and containers. It combines the features of KVM (Kernel-based Virtual Machine) and LXC (Linux Containers), offering a robust and scalable solution for managing virtual environments. Proxmox allows administrators to efficiently manage VMs, implement high-availability clusters, orchestrate network configurations, and secure deployments with built-in firewall functionalities. Ideal for both small-scale settings and enterprise-level operations, Proxmox provides a flexible and cost-effective approach to data center management.
-
1
Create USB and download the ISO
First, download and create a USB drive using Balena Etcher. Download the Proxmox ISO for servers from https://www.proxmox.com/en/downloads. Then, simply install it like any other operating system. -
2
In the Datacenter, delete the local-lvm (Proxmox) so that only one storage option remains, as displayed in the storage image.
Here, the LVM that has been deleted is displayed (ALSO Edit Permissions). -
3
We partition the hard drive.
lvremove /dev/pve/data

Do you really want to remove active logical volume pve/data? [y/n]: y
  Logical volume "data" successfully removed.

lvresize -l +100%FREE /dev/pve/root
  Size of logical volume pve/root changed from 96.00 GiB (24576 extents) to <456.92 GiB (116971 extents).
  Logical volume pve/root successfully resized.

resize2fs /dev/mapper/pve-root
  resize2fs 1.47.0 (5-Feb-2023)
Filesystem at /dev/mapper/pve-root is mounted on /; on-line resizing required
old_desc_blocks = 12, new_desc_blocks = 58
The filesystem on /dev/mapper/pve-root is now 119778304 (4k) blocks long.


#Done, after the three commands, the hard drive now occupies all the space.
-
4
For Laptops: To prevent the system from going into hibernation or sleep, and also to turn off the screen:
using the script lid
uncomment:
HandleLidSwitch=ignore
HandleLidSwitchExternalPower=ignore
HandleLidSwitchDocked=ignore


sudo nano /etc/default/grub
#Add
GRUB_CMDLINE_LINUX="consoleblank=60"


sudo update-grub
Generating grub configuration file ...
Found linux image: /boot/vmlinuz-6.8.4-2-pve
Found initrd image: /boot/initrd.img-6.8.4-2-pve
Found memtest86+ 64bit EFI image: /boot/memtest86+x64.efi
done
- Download

Proxmox web setup
Disk
We need to give permission to the hard drive to store VM and Container images.
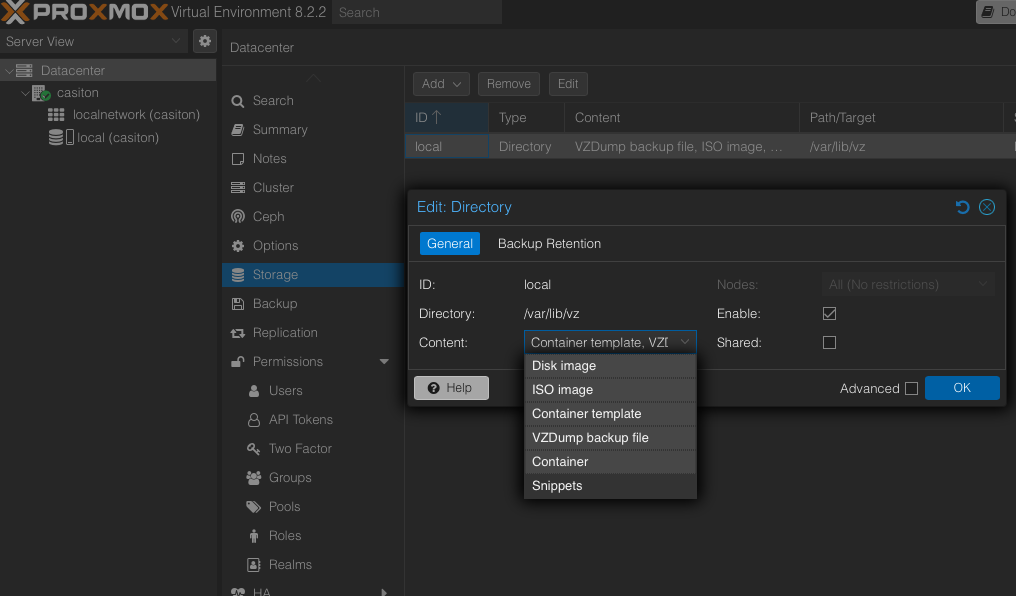
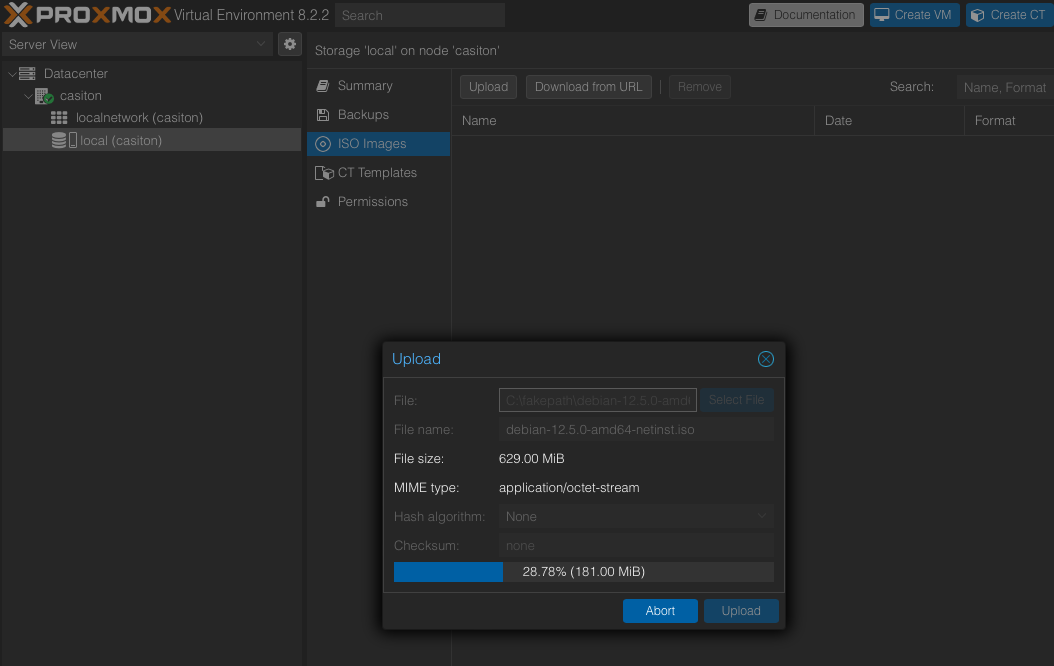
Upload
Upload the ISOs needed to install operating systems.
Containers
We can also download container templates for quick deployment of Proxmox CTs (container templates).

VMs
Done, we can now start deploying machines on our new Proxmox.
lid
This is the "lid" script.
#!/bin/bash

# Función para mostrar el mensaje de ayuda y preguntar si desea continuar
show_help_and_confirm() {
    echo
    echo "El comando que este script ejecuta es:"
    echo "sudo nano /etc/systemd/logind.conf"
    echo
    echo "Presione Enter para continuar o 'c' para salir."

    # Preguntar al usuario si desea continuar
    read -p "Deseas continuar [c/S] " response

    # Convertir la respuesta a minúsculas
    response=$(echo "$response" | tr '[:upper:]' '[:lower:]')

    # Si la respuesta es 'c', salir del script
    if [ "$response" == "c" ]; then
        echo "Saliendo del script."
        exit 0
    fi
}

# Verificar si se pasó el argumento -h
if [ "$1" == "-h" ]; then
    show_help_and_confirm
fi


sudo nano /etc/systemd/logind.conf

echo "Restart the service now? (Press S for yes, Enter for no)"
read -k1 input
if [[ $input == "S" || $input == "s" ]]; then
    sudo systemctl restart systemd-logind
    echo "systemd-logind service restarted."
else
    echo "You chose not to restart the service. Changes will take effect on next reboot."
fi
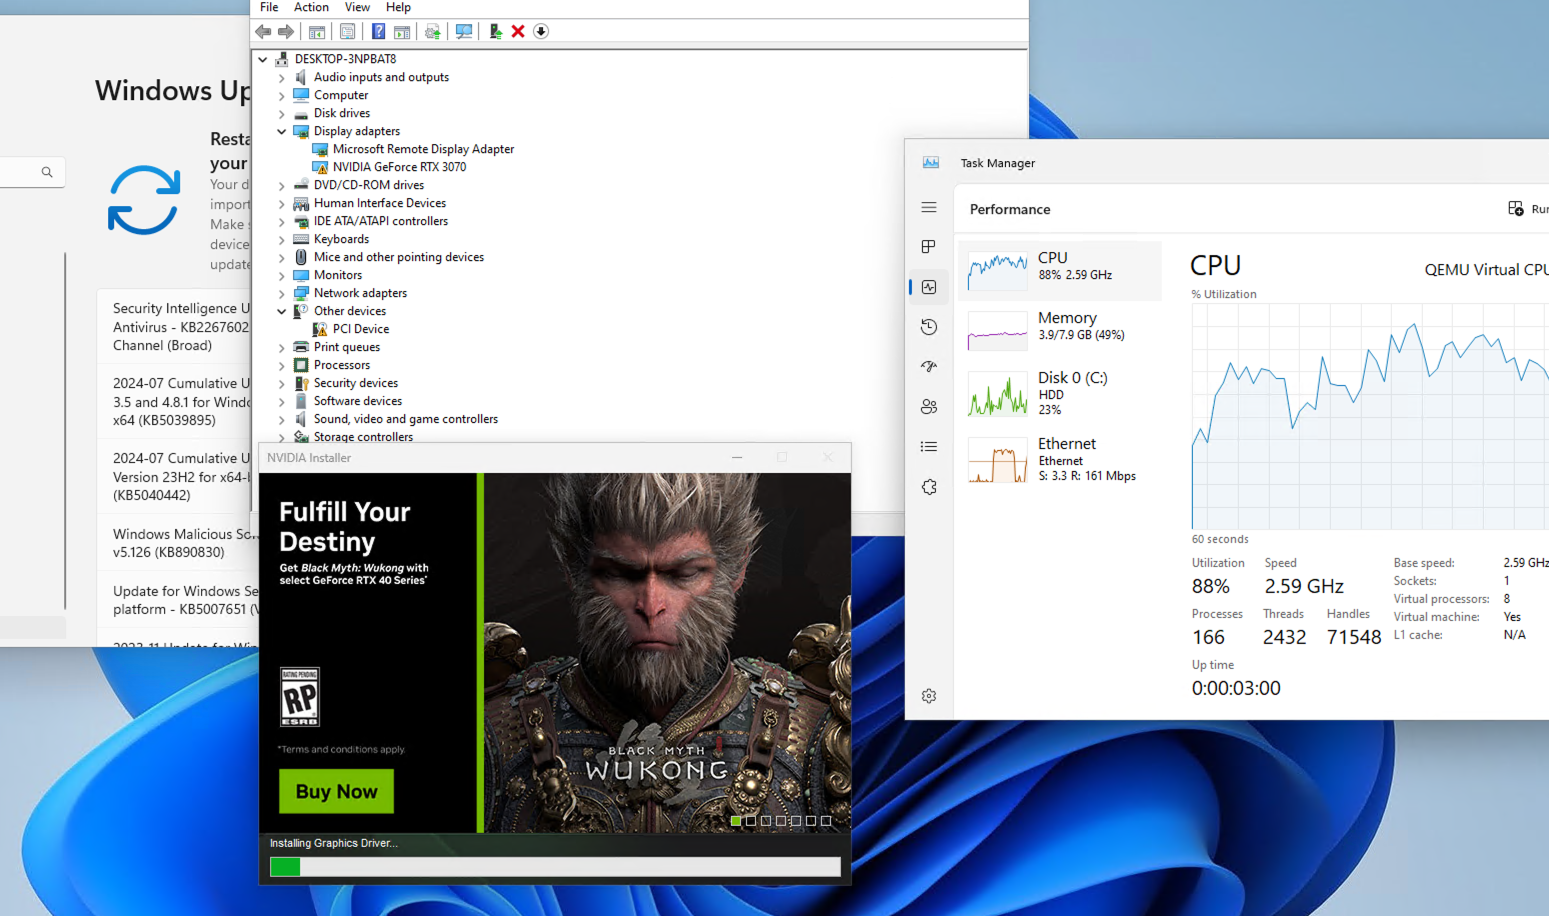
Nvidia Installation
This script is designed to configure a Linux system for using VFIO (Virtual Function I/O), which allows you to pass through hardware devices, such as GPUs, directly to virtual machines. This setup is particularly useful for high-performance tasks like gaming or GPU-intensive applications in a VM.
#!/bin/bash

#for kali I follow this  after I run this scritp and reboot:


#sudo nano /etc/default/grub
#sudo update-grub
#sudo apt update && sudo apt upgrade -y
#sudo apt install linux-headers-$(uname -r)
#sudo apt install linux-image-amd64
#sudo apt install linux-headers-amd64
#sudo apt install linux-headers-generic

#wget https://uk.download.nvidia.com/XFree86/Linux-x86_64/555.42.02/NVIDIA-Linux-x86_64-555.42.02.run


# Ruta del archivo de configuración de GRUB
GRUB_CONFIG="/etc/default/grub"

# Backup del archivo de configuración de GRUB antes de modificarlo
cp $GRUB_CONFIG $GRUB_CONFIG.bak

# Comenta la línea existente y añade la nueva configuración debajo
sed -i '/GRUB_CMDLINE_LINUX_DEFAULT=/c\#&\nGRUB_CMDLINE_LINUX_DEFAULT="quiet intel_iommu=on"' $GRUB_CONFIG

# Actualizar GRUB
update-grub


# Backup de los archivos de configuración antes de modificarlos
cp /etc/modules /etc/modules.bak

# Verificar y hacer backup de los archivos de configuración específicos si existen
[[ -f /etc/modprobe.d/iommu_unsafe_interrupts.conf ]] && cp /etc/modprobe.d/iommu_unsafe_interrupts.conf /etc/modprobe.d/iommu_unsafe_interrupts.conf.bak
[[ -f /etc/modprobe.d/kvm.conf ]] && cp /etc/modprobe.d/kvm.conf /etc/modprobe.d/kvm.conf.bak
[[ -f /etc/modprobe.d/blacklist.conf ]] && cp /etc/modprobe.d/blacklist.conf /etc/modprobe.d/blacklist.conf.bak
[[ -f /etc/modprobe.d/vfio.conf ]] && cp /etc/modprobe.d/vfio.conf /etc/modprobe.d/vfio.conf.bak

# Añadir módulos VFIO al archivo de módulos
echo "vfio" >> /etc/modules
echo "vfio_iommu_type1" >> /etc/modules
echo "vfio_pci" >> /etc/modules
echo "vfio_virqfd" >> /etc/modules

# Crear o modificar archivos de configuración con los valores necesarios
echo "options vfio_iommu_type1 allow_unsafe_interrupts=1" > /etc/modprobe.d/iommu_unsafe_interrupts.conf
echo "options kvm ignore_msrs=1" > /etc/modprobe.d/kvm.conf
echo "blacklist radeon" > /etc/modprobe.d/blacklist.conf
echo "blacklist nouveau" >> /etc/modprobe.d/blacklist.conf
echo "blacklist nvidia" >> /etc/modprobe.d/blacklist.conf
echo "options vfio-pci ids=10de:2484,10de:228b,10de:0ffd,10de:0e1b disable_vga=1" > /etc/modprobe.d/vfio.conf


# Actualizar initramfs
update-initramfs -u

echo -e "\n\033[1;32m_________________________________________________________\033[0m\n"
echo "instructions inside this script for kali"

echo -e "\n\033[1;32m_________________________________________________________\033[0m\n"
#1b:00.0 VGA compatible controller: NVIDIA Corporation GA104 [GeForce RTX 3070] (rev a1) (prog-if 00 [VGA controller])
#1b:00.0 0300: 10de:2484 (rev a1)
#" con lspci -v buscamos
#04:00.0 VGA compatible controller: NVIDIA Corporation GA104 [GeForce RTX 3070] (rev a1) (prog-if 00 [VGA controller])
#03:00.0 VGA compatible controller: NVIDIA Corporation GK107 [NVS 510] (rev a1) (prog-if 00 [VGA controller])"
#de ahi tomamos y ponemos:
#lspci -n -s 04:00
#04:00.0 0300: 10de:2484 (rev a1)
#04:00.1 0403: 10de:228b (rev a1)
#lspci -n -s 03:00
#03:00.0 0300: 10de:0ffd (rev a1)
#03:00.1 0403: 10de:0e1b (rev a1)

#para  crear las lineas:
#options vfio-pci ids=10de:2484,10de:228b,10de:0ffd,10de:0e1b disable_vga=1

#https://youtu.be/X_VwQpJSXIQ?si=nPfJwXS8sX9CZ9iWFor kali
To install the nvidia in kali
#!/bin/bash

# Download the NVIDIA driver
echo "Downloading the NVIDIA driver..."
wget https://uk.download.nvidia.com/XFree86/Linux-x86_64/555.42.02/NVIDIA-Linux-x86_64-555.42.02.run

# Ensure the script is executable
chmod +x NVIDIA-Linux-x86_64-555.42.02.run

# Disable the nouveau module
echo "Disabling the nouveau module..."
echo "blacklist nouveau" | sudo tee /etc/modprobe.d/blacklist-nouveau.conf > /dev/null
echo "options nouveau modeset=0" | sudo tee -a /etc/modprobe.d/blacklist-nouveau.conf > /dev/null

# Install development tools and headers for the current kernel
echo "Installing development tools and kernel headers..."
sudo apt-get update
sudo apt-get install -y build-essential linux-headers-$(uname -r)

# Update initramfs
echo "Updating initramfs..."
sudo update-initramfs -u

# Final message
echo "Please reboot the machine to apply changes."
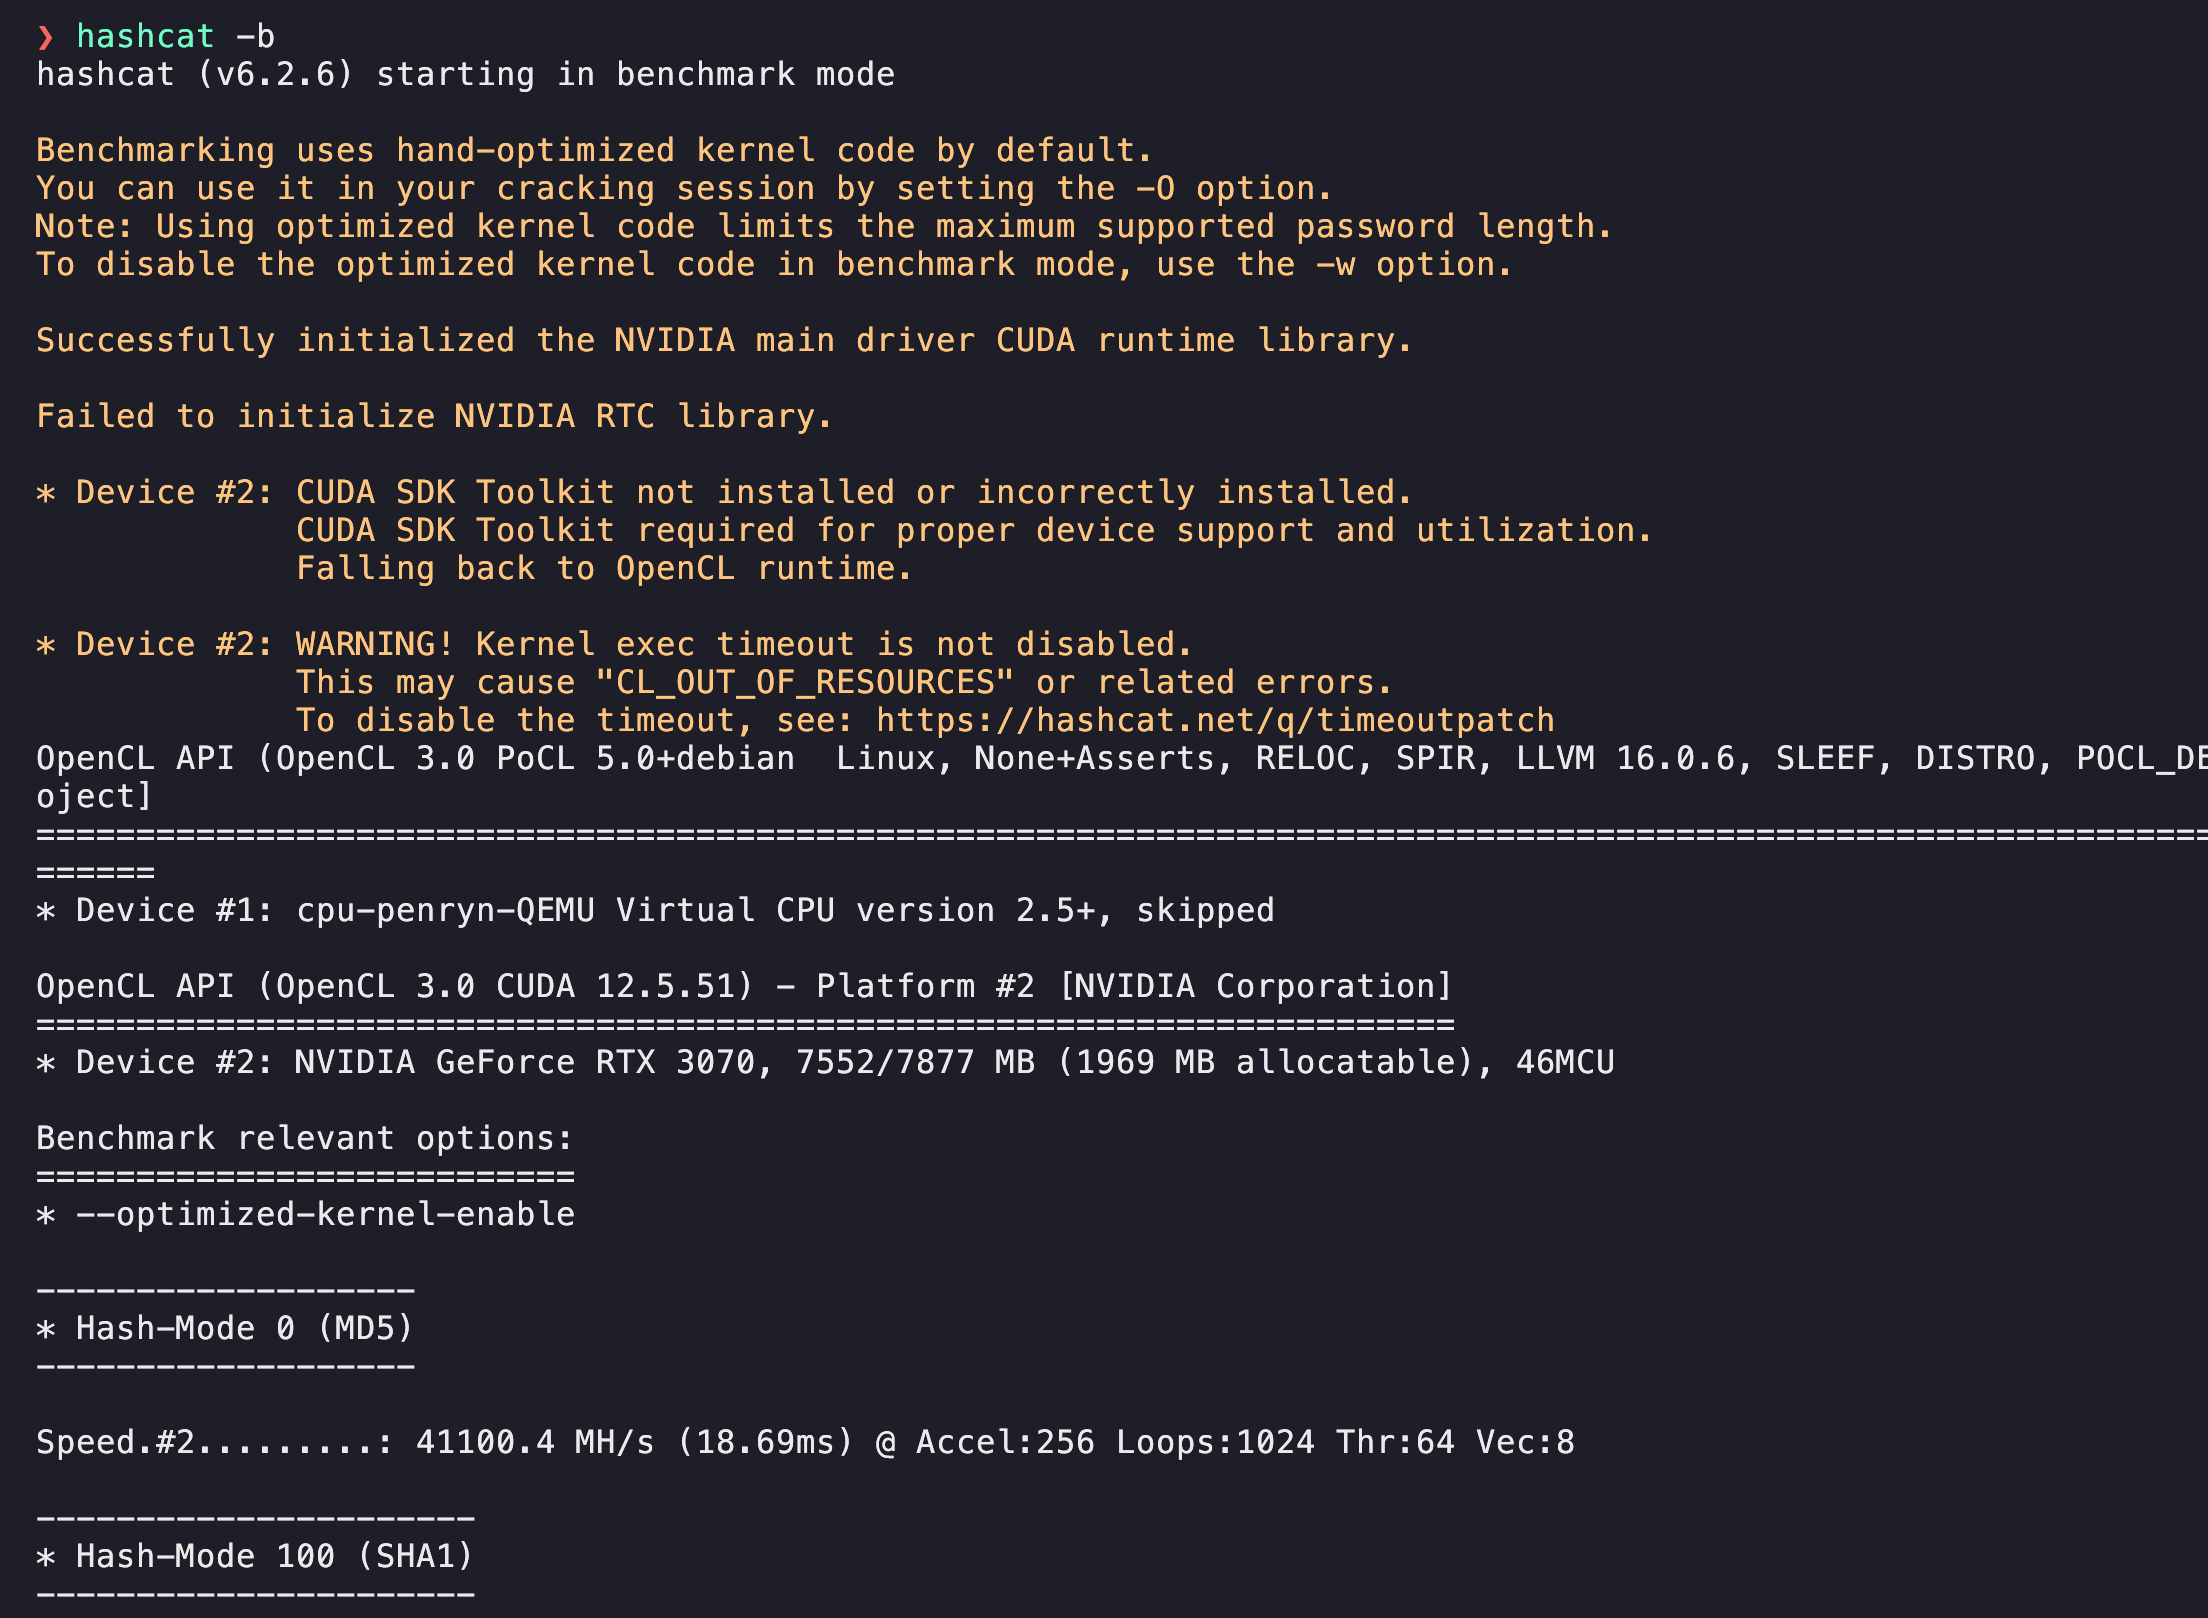
Kali using NVIDIA with hashcat
Windows after adding PCI Nvidia
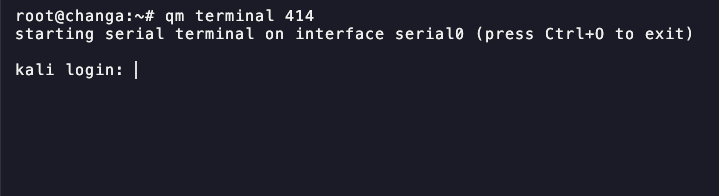
Terminal qm activation
Steps
Edit grub
sudo nano /etc/default/grub
sudo systemctl enable serial-getty@ttyS0.service
sudo systemctl start serial-getty@ttyS0.service
sudo update-grub
sudo shutdown -h now
Set serial
serial port with VM shutdown
log into proxmox server and execute: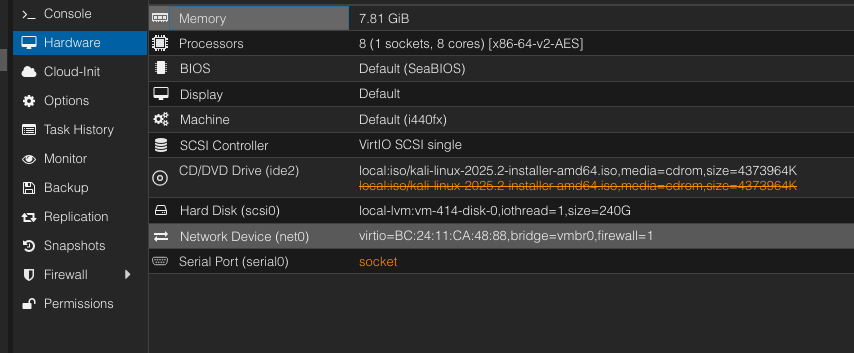
qm set 414 -serial0 socket
#changa 414 for the VM id
Start VM
Make sure the Serial port is not highlighted red
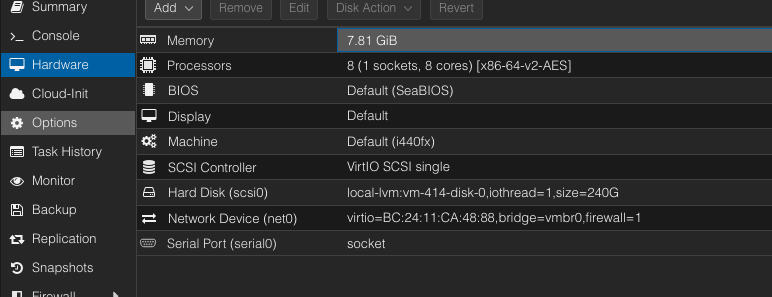
Log into VM
From Proxmox Cli execute: qm terminal VM-ID
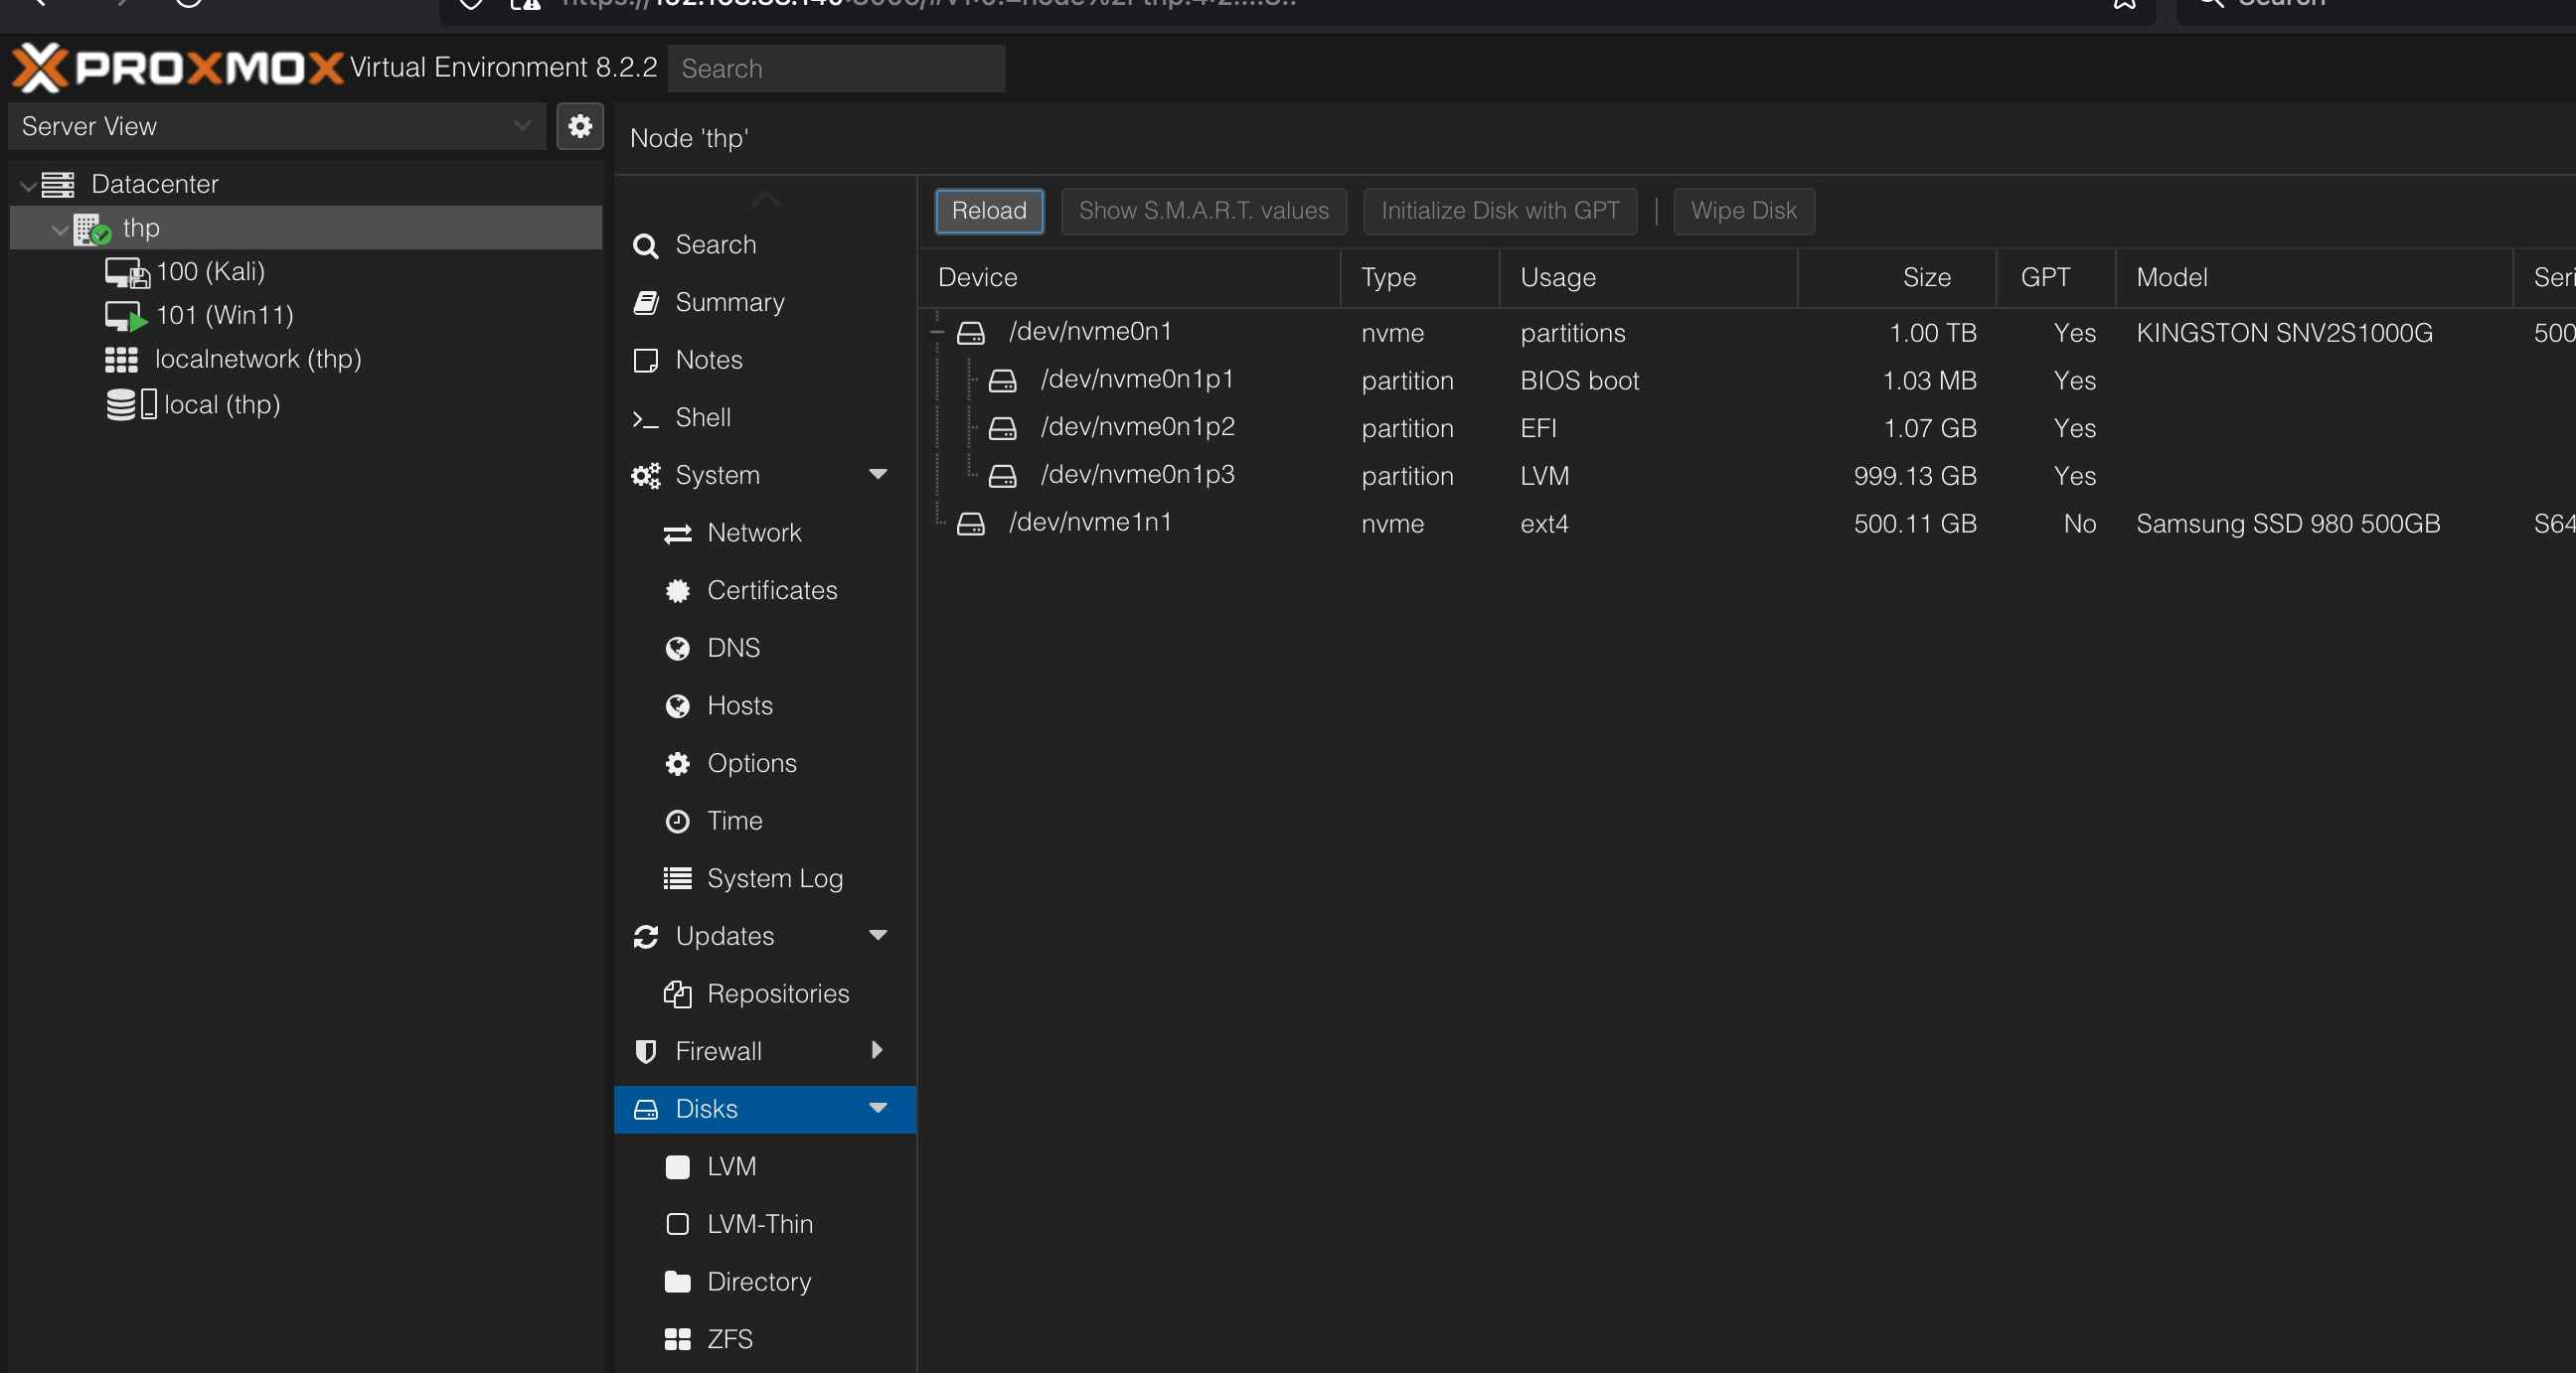
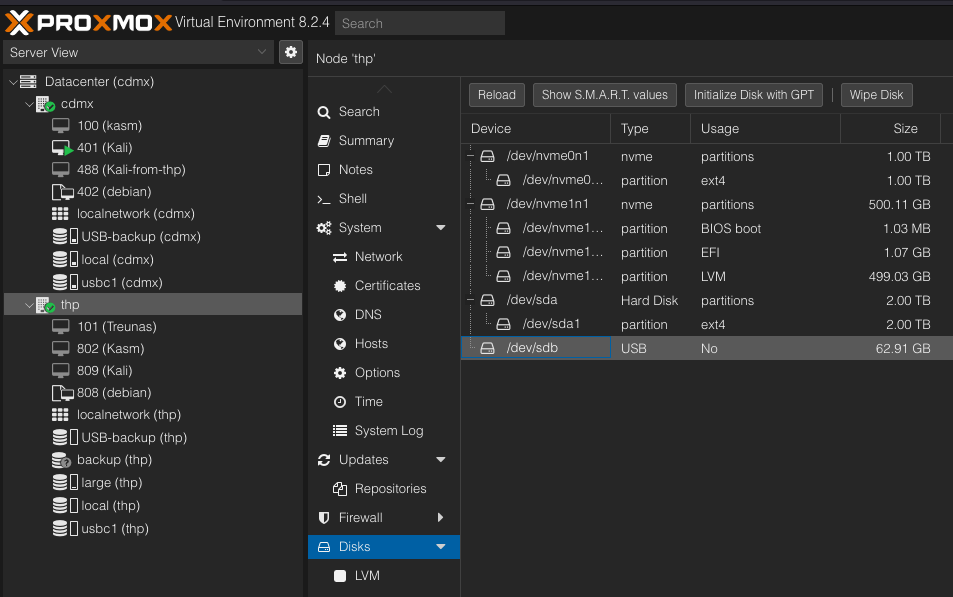
Adding Second HD and ISOS
Steps
Wipe and GPT
Wipe Disk and then Initialize Disk with GPT
Directory
Create the directory
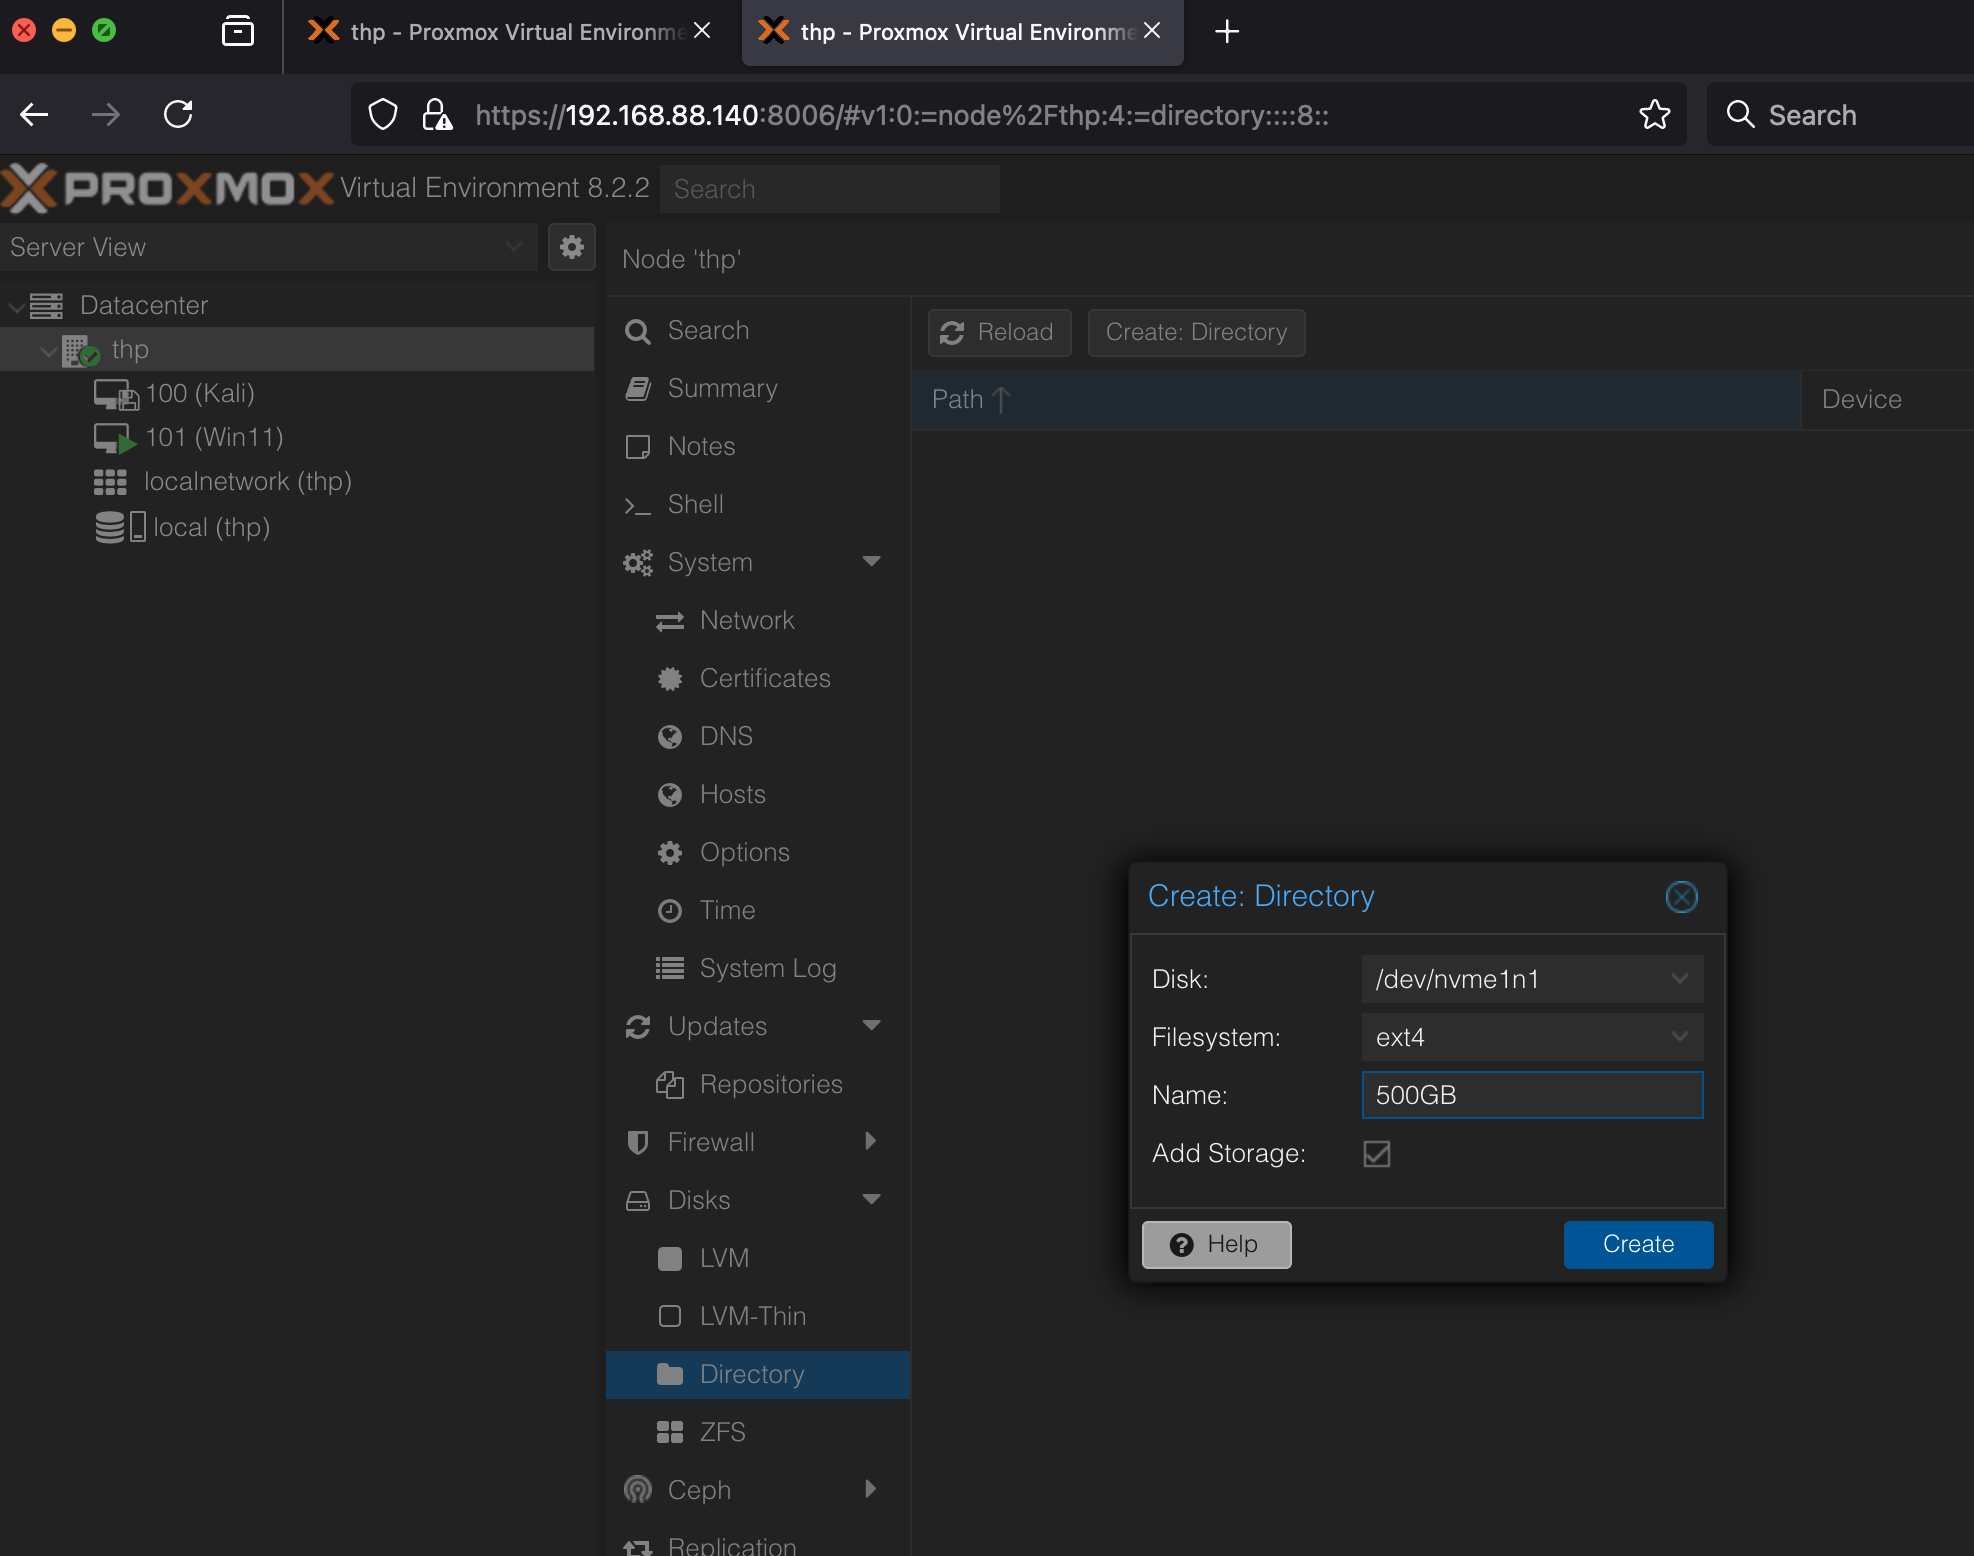
Permissions
Just in case we need to update the permissions

Isos
ISOs can be moved from the terminal

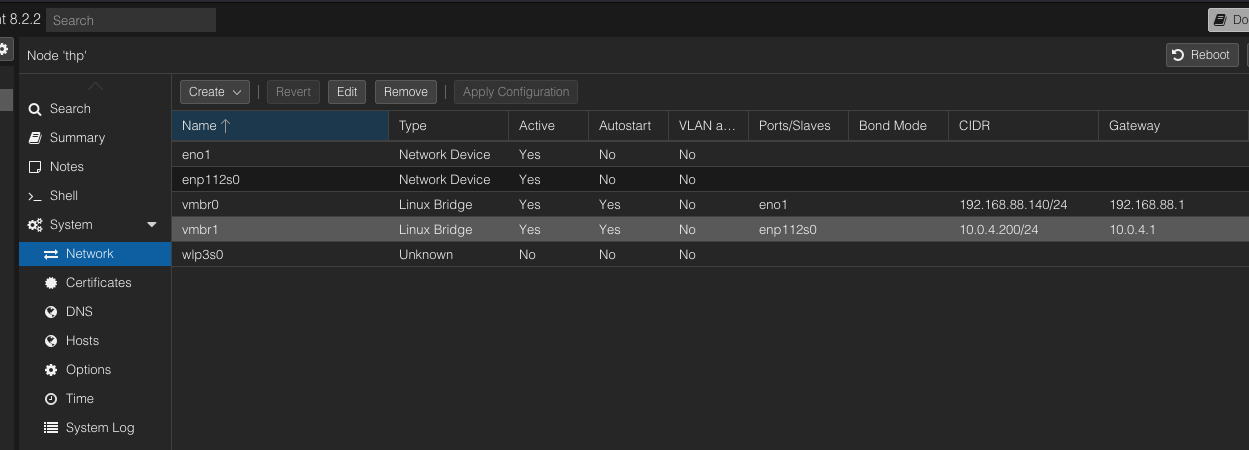
Adding ethernet interfaces
Create the new bridge just
Just add the name of the interface to active, put the name on bridge ports
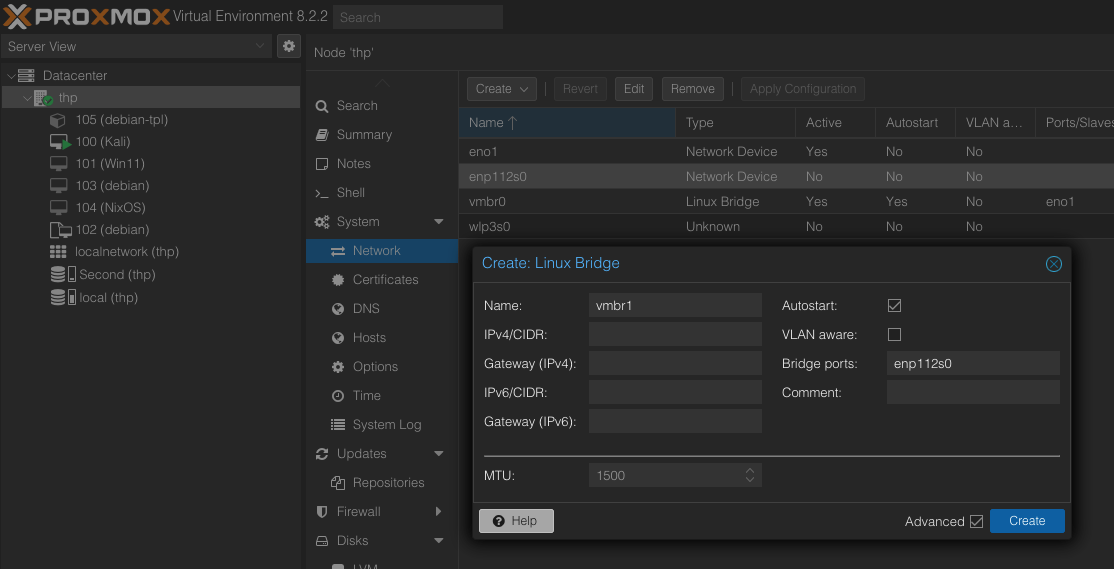
Click Apply the configuration
Assign IP
If you get an error assigning the IP, use CLI
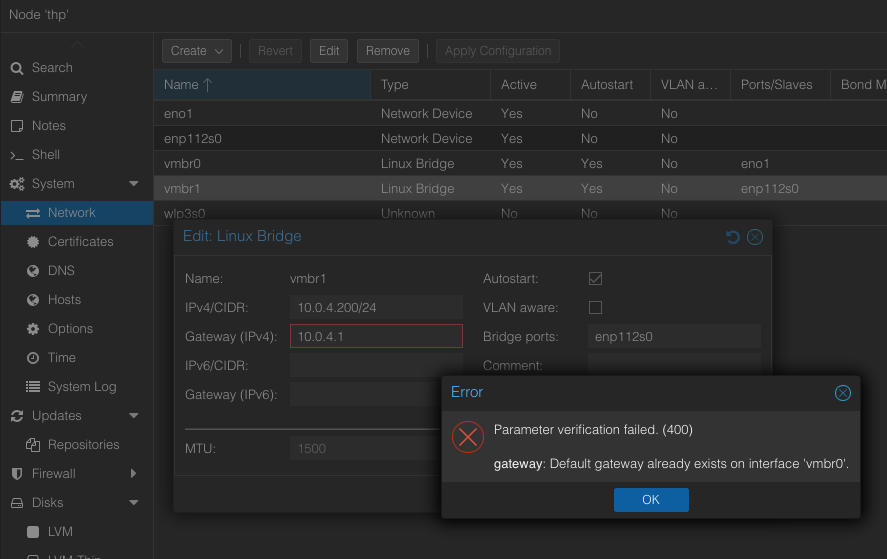
Assign IP CLI
Just add address and gateway lines to the file /etc/network/interfaces
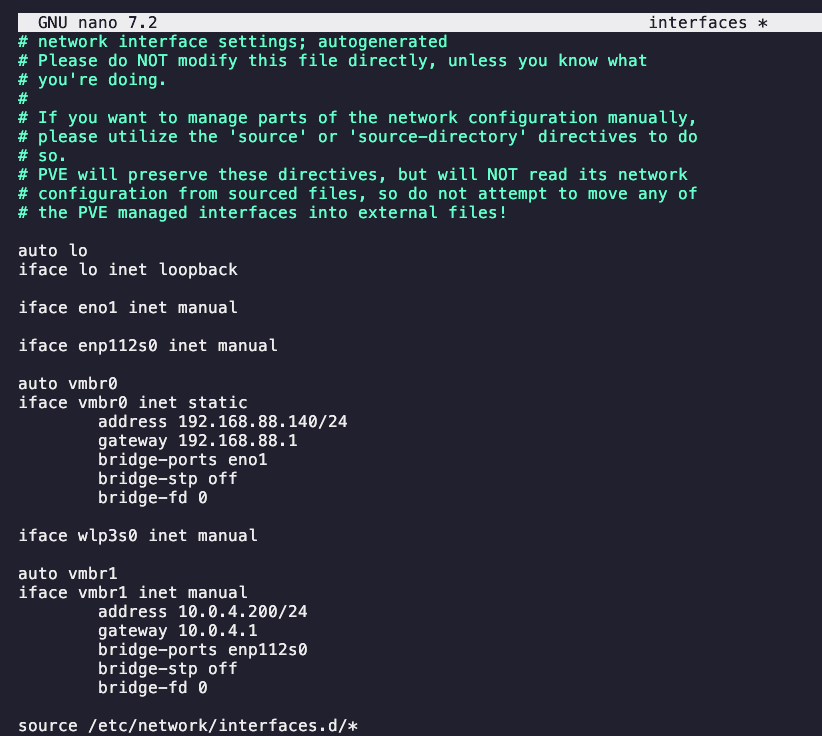
Good idea to make a copy of the file before editing
Its done
Now the network is avaiable to assign to any VM
Adding new Network
Here I am adding the new interfaces which is a VPN network on Unifi

Backup
Insert USB and wipe it
Wipe and Initialize
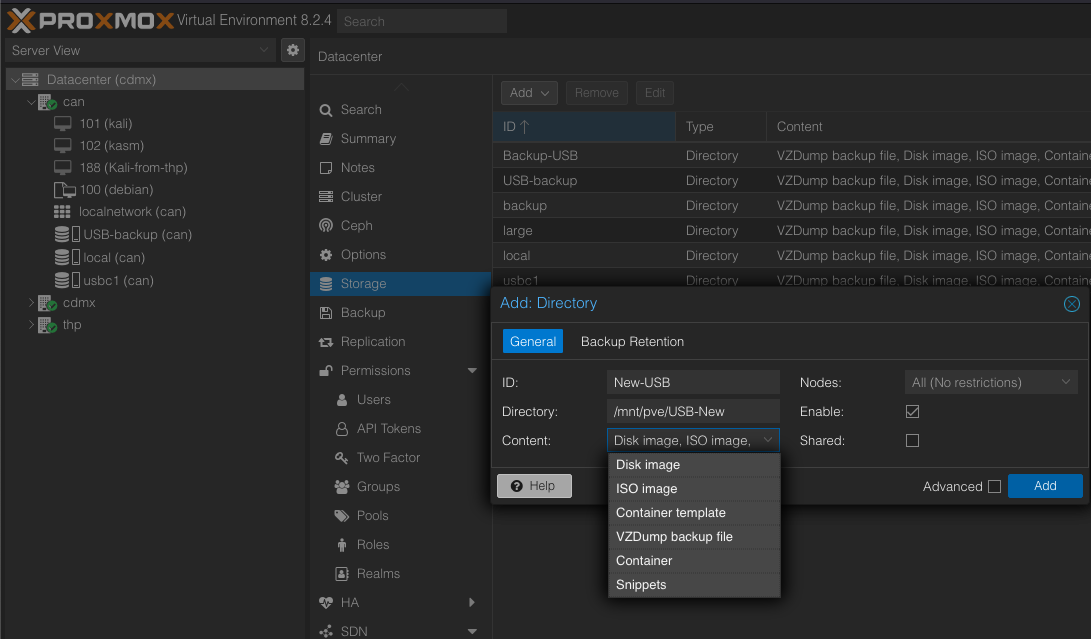
Add Directory
Add all the content and mount the directory

Back up VM
Back up the vm in the new directory, USB, with STOP mode.
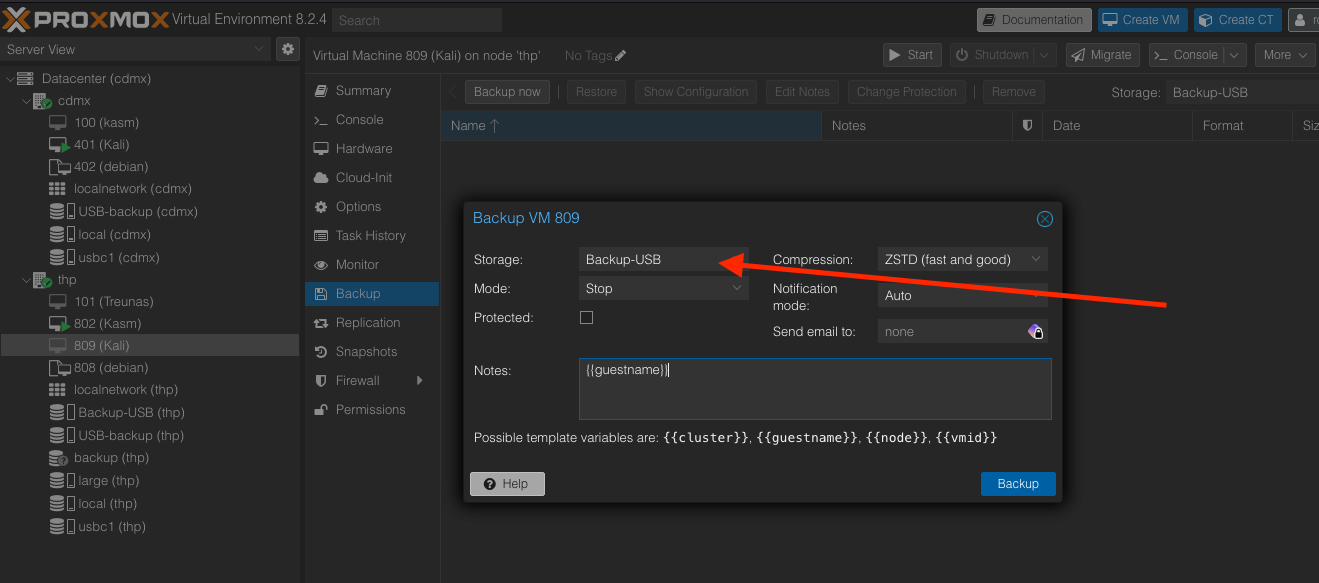
Make sure the USB-driver is select.
Umount
After backup is done, unmount the USB
root@thp:~# sudo umount /mnt/pve/Backup-USBRestore
Insert USB and mount
Go to shell and create a new folder
mkdir /mnt/pve/USB-New

#find the USB
❯ lsblk
NAME         MAJ:MIN RM   SIZE RO TYPE MOUNTPOINTS
sda            8:0    0 931.5G  0 disk
└─sda1         8:1    0 931.5G  0 part /mnt/pve/Samsung
sdb            8:16   1  58.6G  0 disk
└─sdb1         8:17   1  58.6G  0 part

#Mount the usb
sudo mount /dev/sdb1 /mnt/pve/USB-New
❯ lsblk
NAME         MAJ:MIN RM   SIZE RO TYPE MOUNTPOINTS
sda            8:0    0 931.5G  0 disk
└─sda1         8:1    0 931.5G  0 part /mnt/pve/Samsung
sdb            8:16   1  58.6G  0 disk
└─sdb1         8:17   1  58.6G  0 part /mnt/pve/USB-New
nvme0n1      259:0    0 953.9G  0 disk
Add storage USB
Also add all the content.
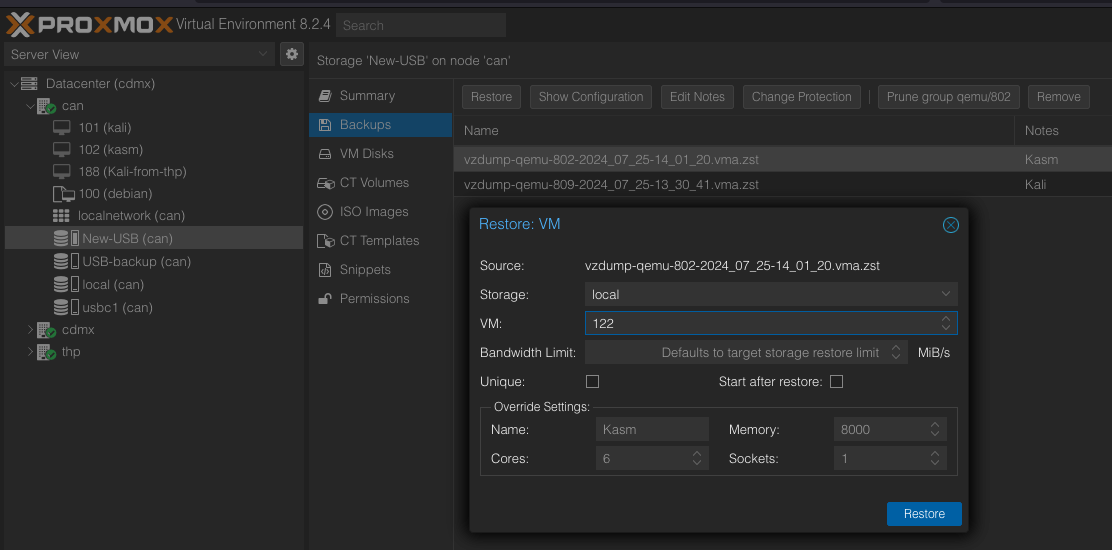
Restore VMs
Go to the new storage created and restore the VMs
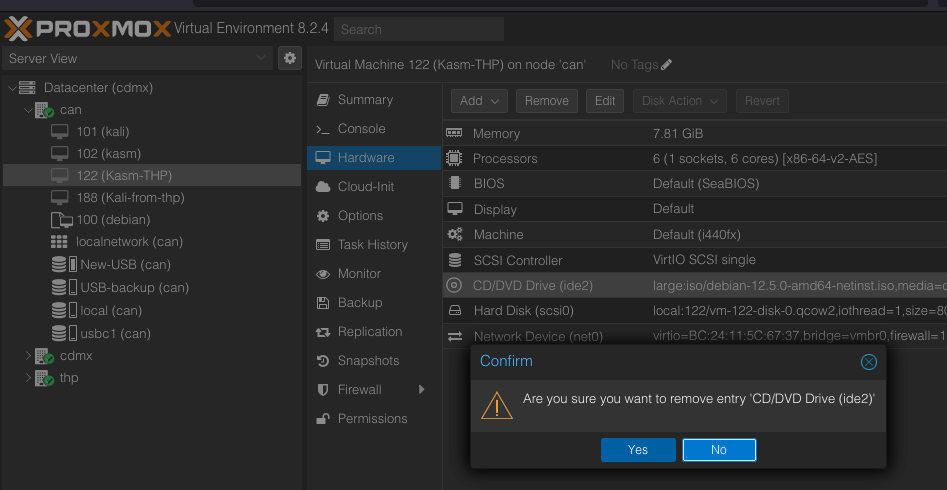
Remove hardware
Remove any hardward not available.
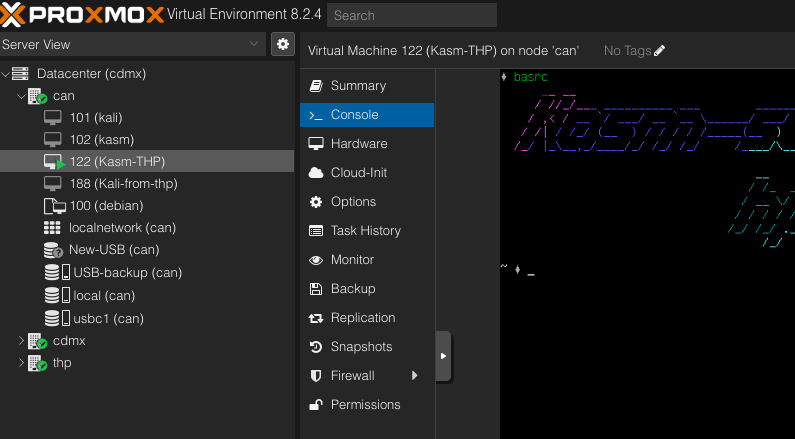
Ready
Now you can see the VM created.
Dont forget to unmount the USB: sudo umount /mnt/pve/USB-New
Nodes
Multiple nodes (servers)
Create Cluster
On the server host create a cluster

Stop VMs and move config files
Then move the configuration VMs files somewhere else
cd /etc/pve/nodes/can/qemu-server
#Move files to home
mv * ~
Info
Copy join information
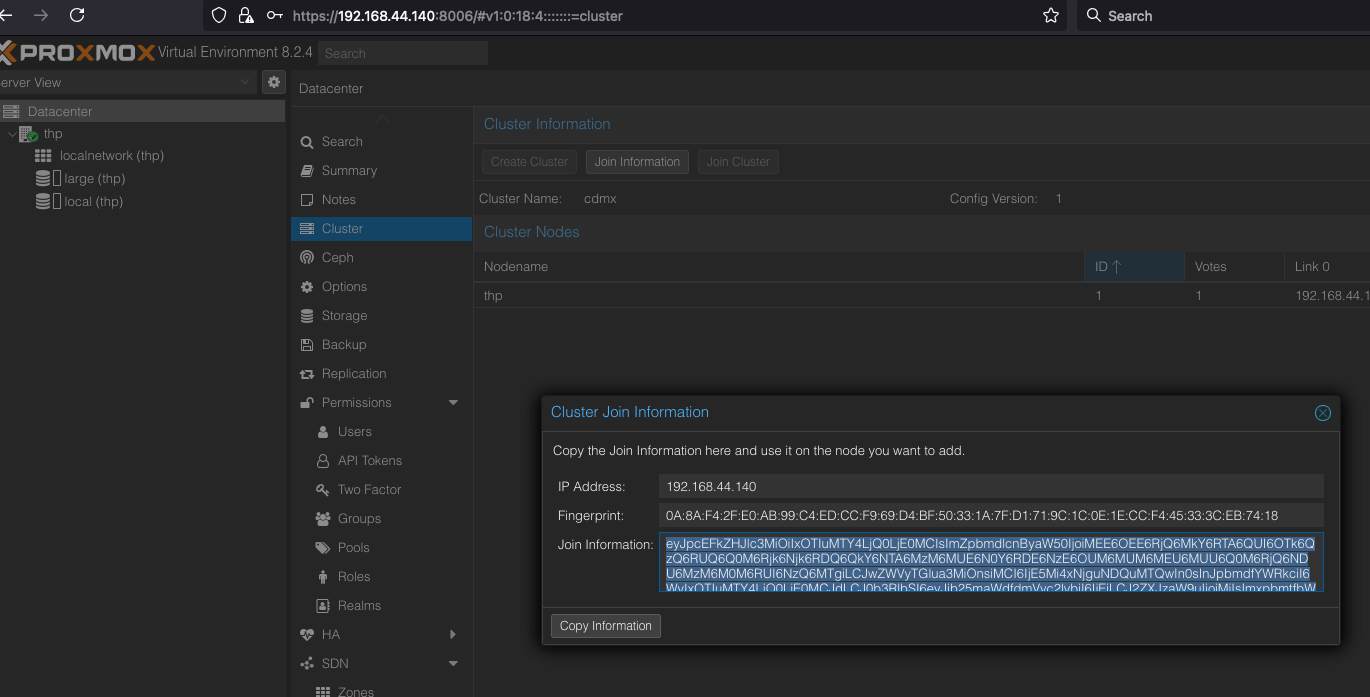
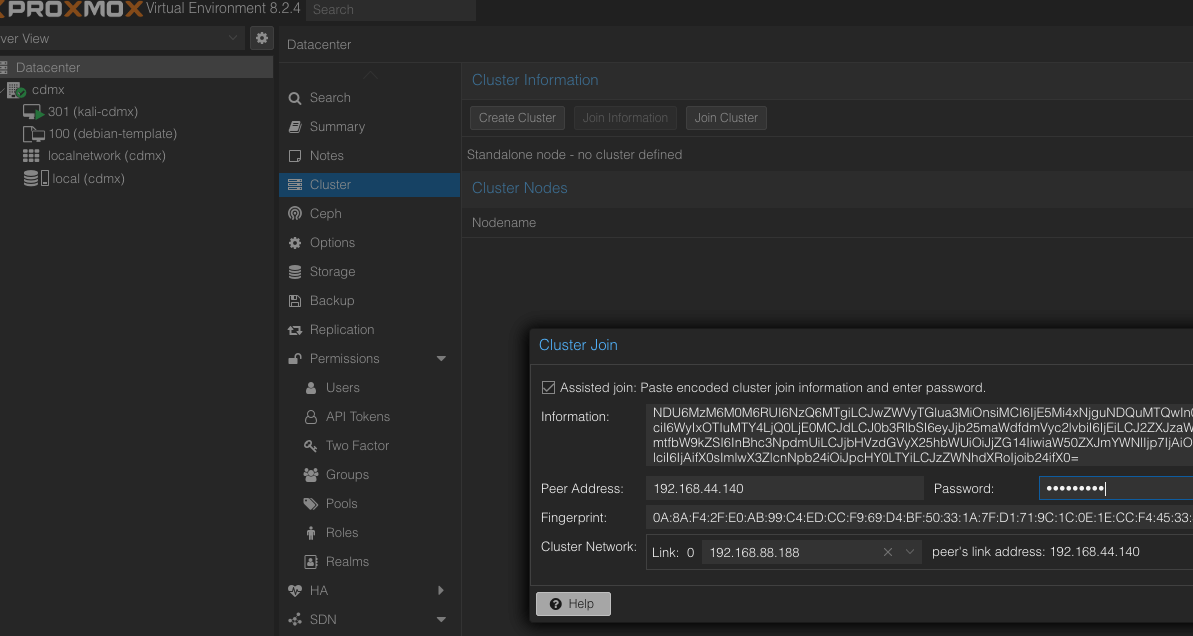
Join server
Join the servers
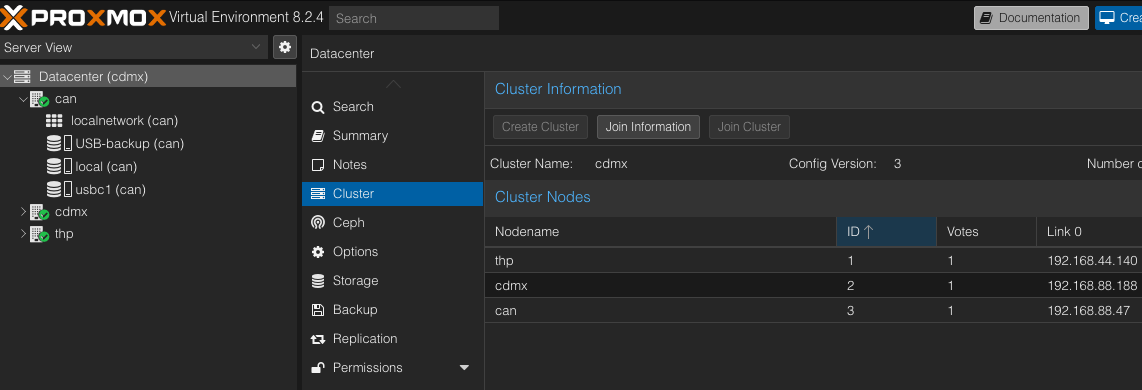
Servers
Now all the Nodes are connected.
Restore VMs
Put the files back to the directory
❯ mv * /etc/pve/nodes/can/qemu-server
mv: cannot create regular file '/etc/pve/nodes/can/qemu-server/100.conf': File exists
mv: cannot create regular file '/etc/pve/nodes/can/qemu-server/101.conf': File exists
❯ cd -
/etc/pve/nodes/can/qemu-server
❯ ls
102.conf 188.confSince we have VMs with same numbers, we need to changes the configuration files.
Isolated Lab Setup
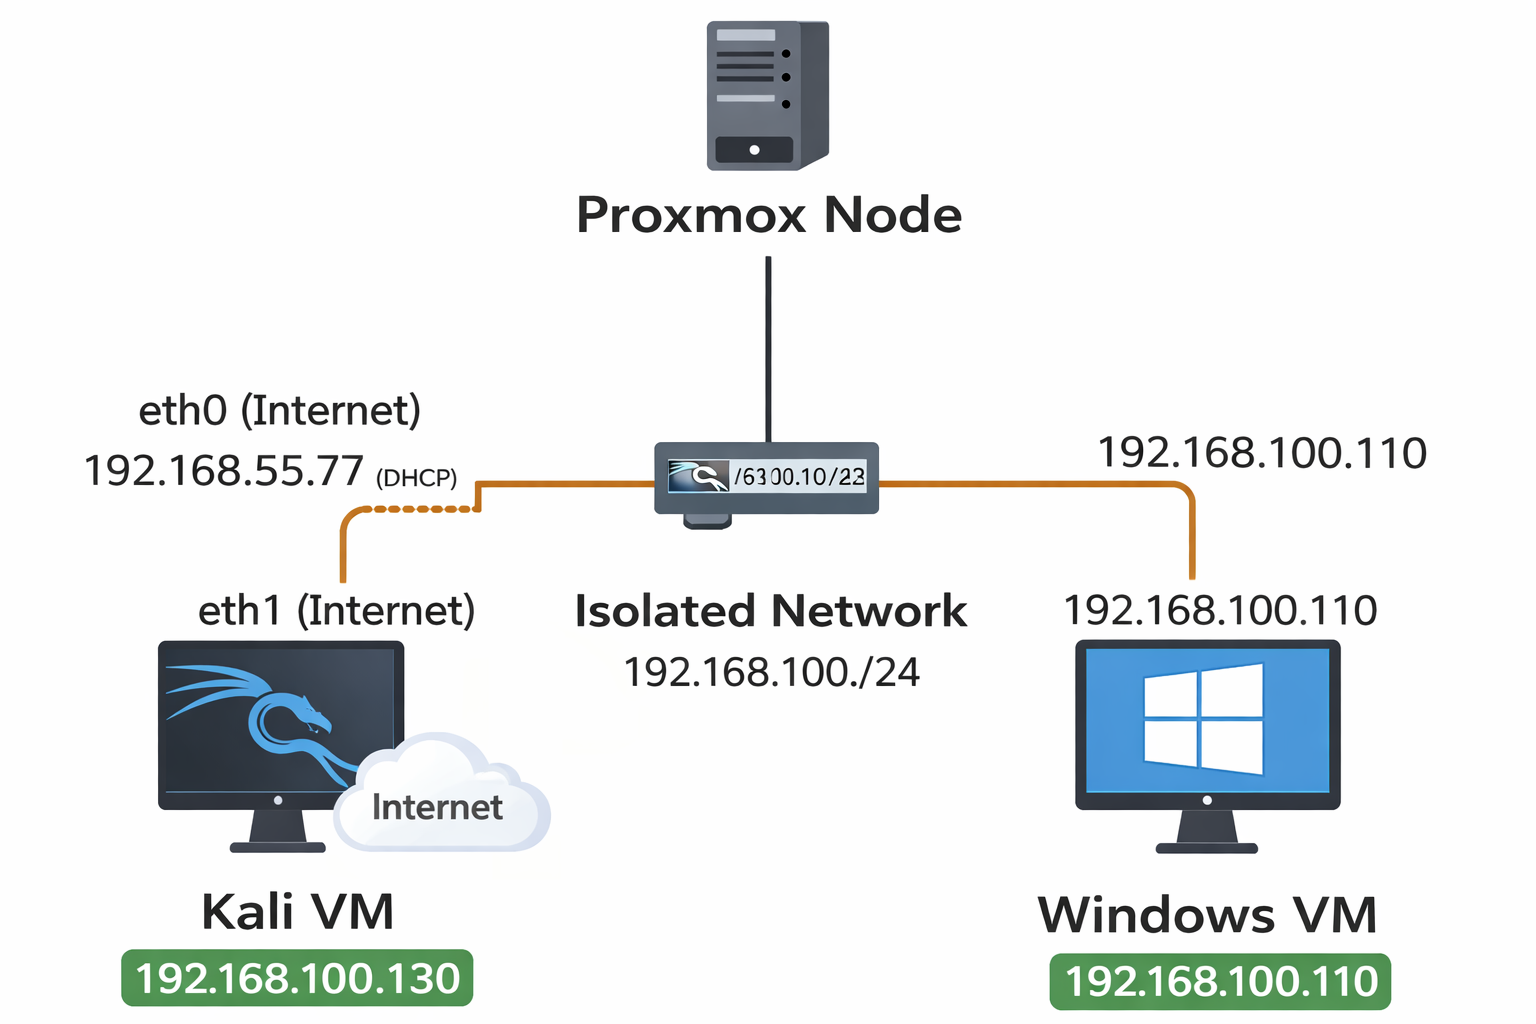
Setting up an isolated network for a Windows victim and a Kali machine.
Lab Topology
This is the topology we are building. You have an isolated Windows victim machine and a Kali machine with two interfaces: one for internet access and another for the isolated network connected to the Windows machine.
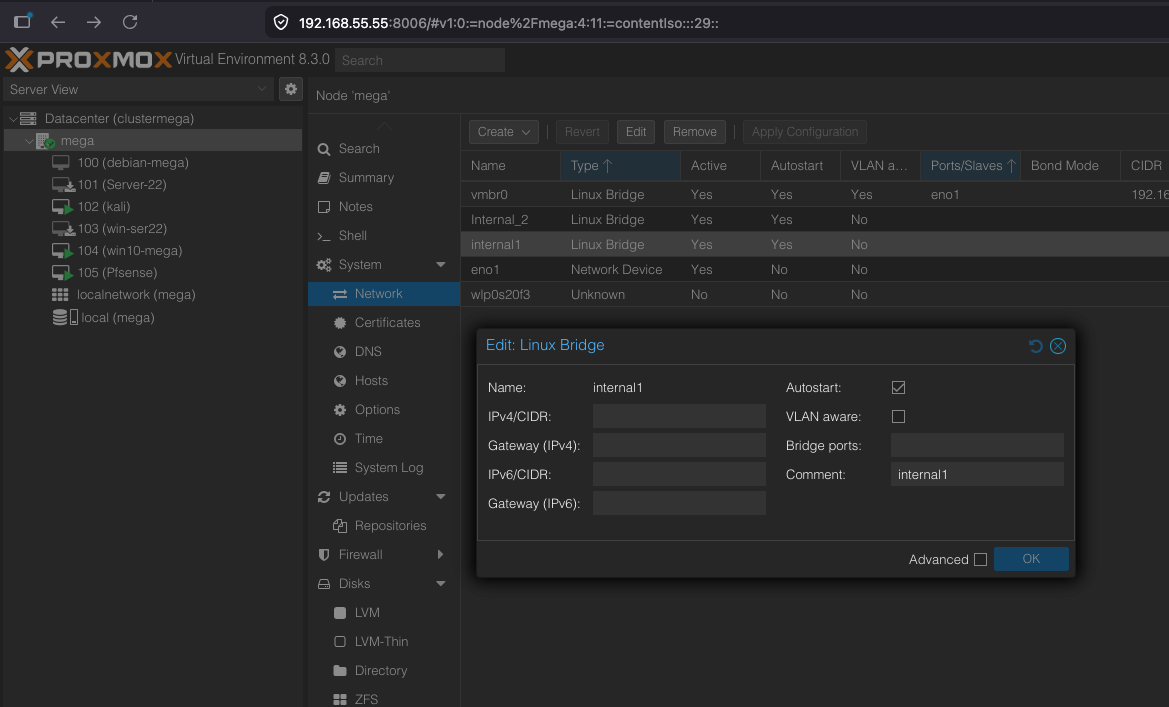
Create Linux Bridge
To create a connection between two machines, create a Linux bridge without any configuration. In this case, we use 'internal1' and 'internal2' as shown in the image below:
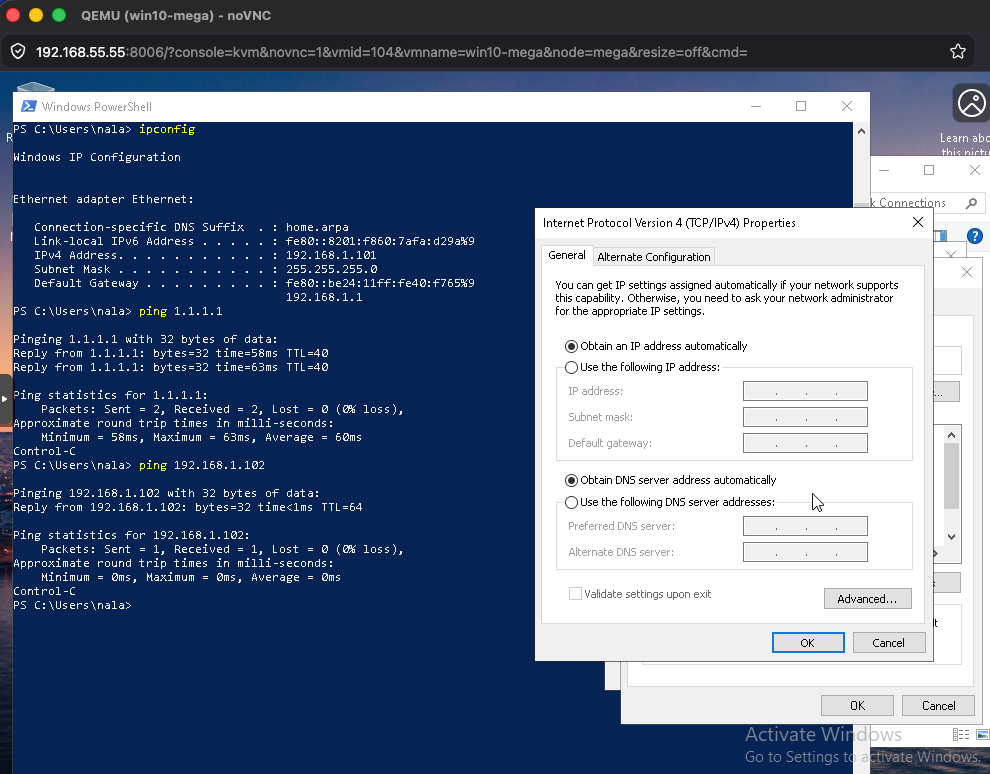
Windows Network Config
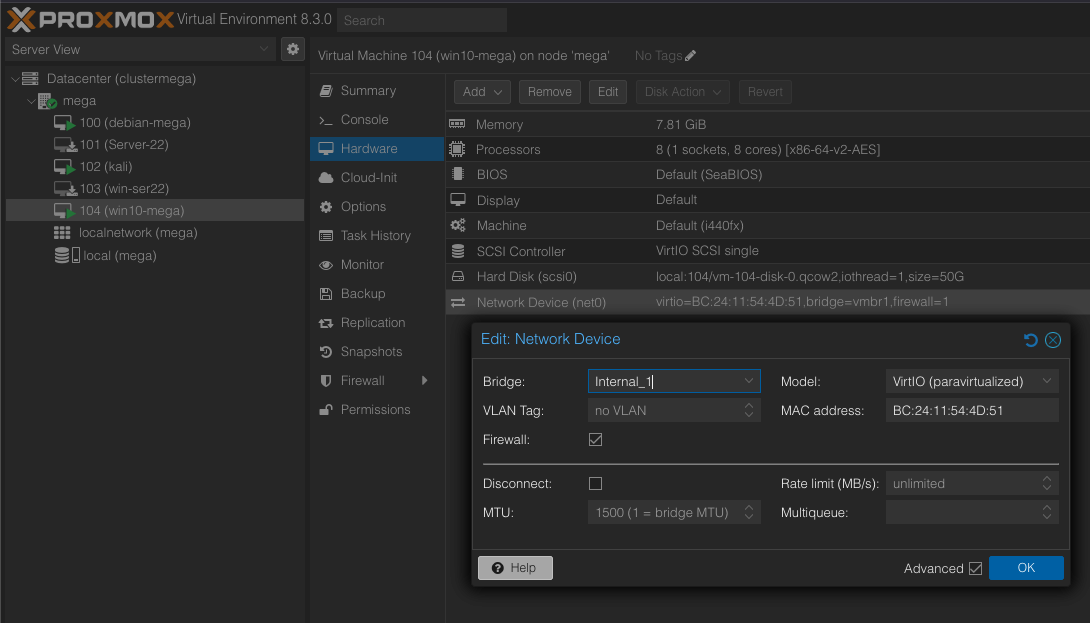
Next, on the Windows machine, update the network configuration to use the new interface.
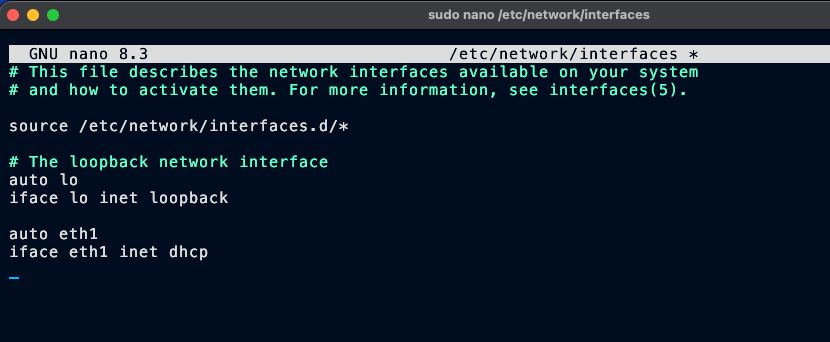
Kali Network Interface
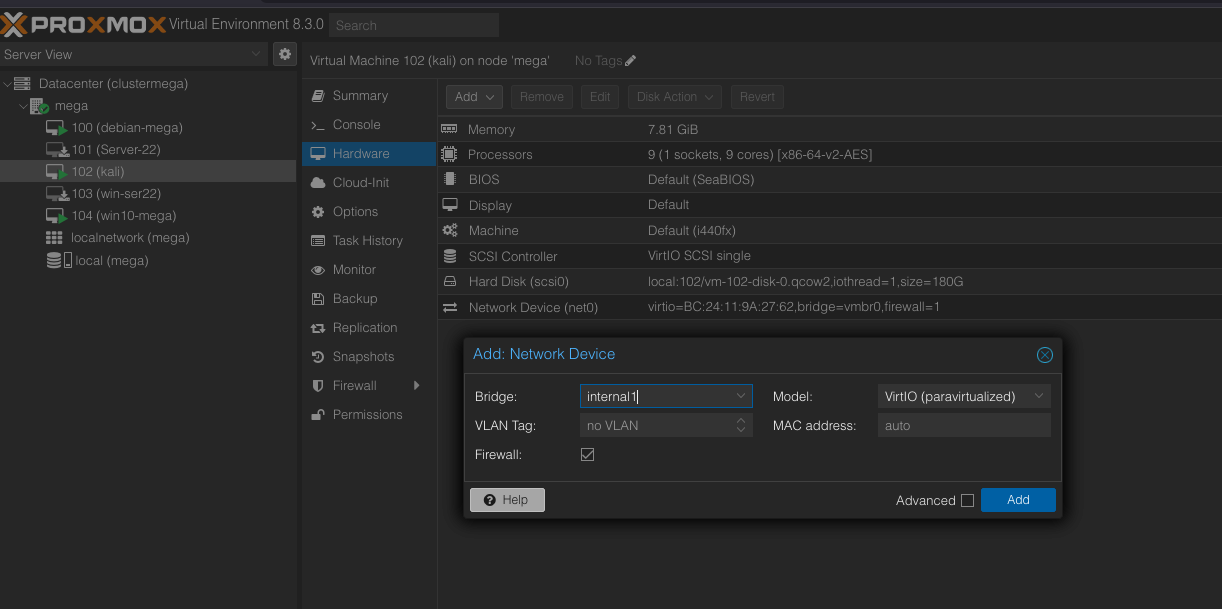
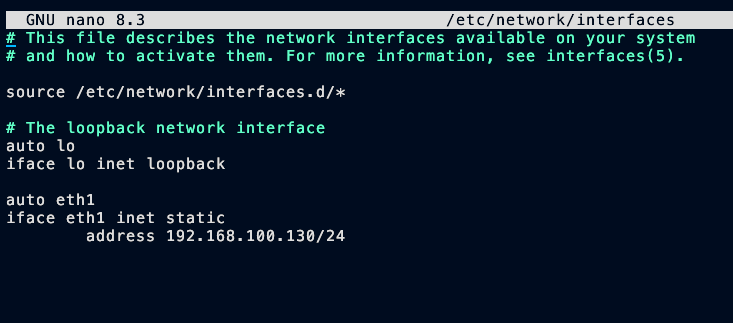
On the Kali machine, add the new interface 'internal1'.
Assign IP Addresses
Configure the IP addresses for the new interface to enable communication. This can be any IP address of your choice.
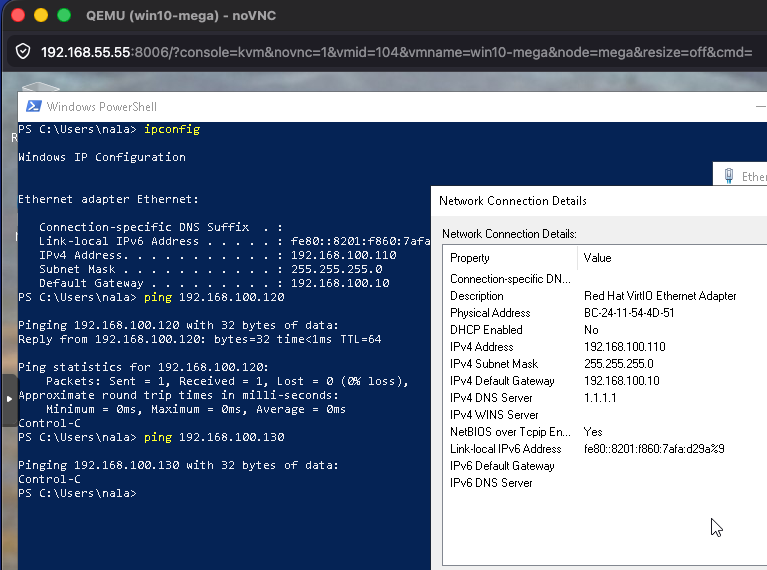
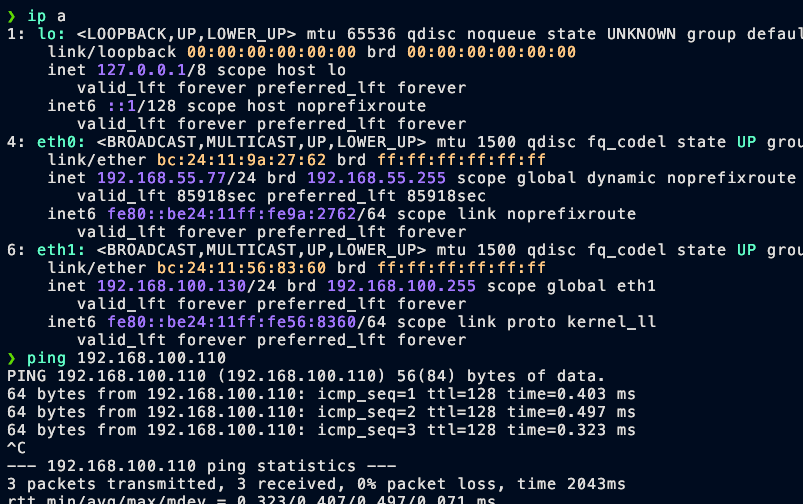
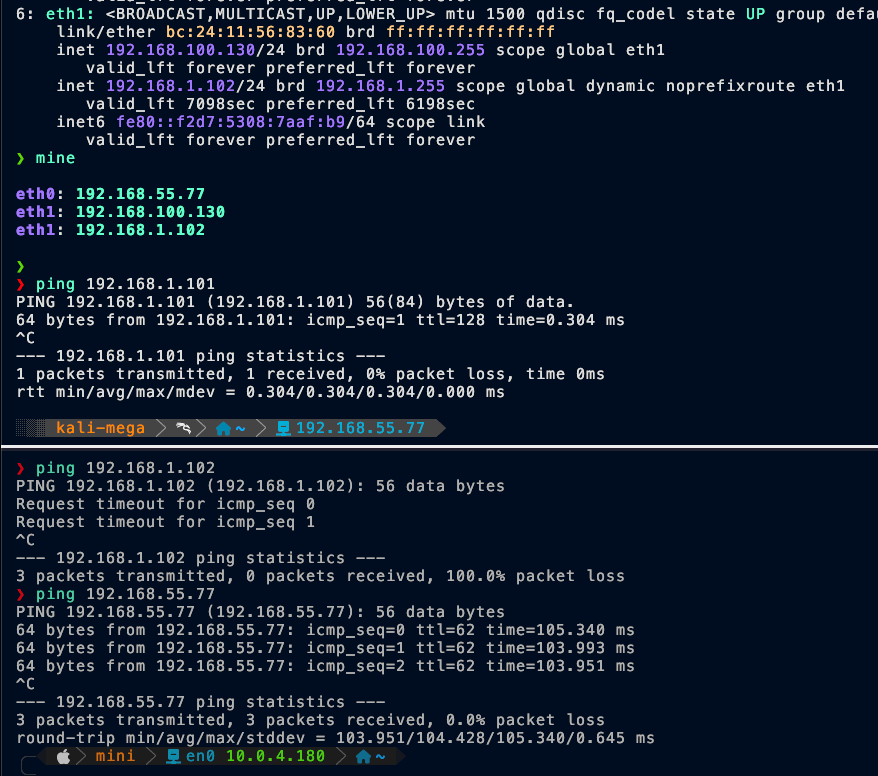
Test Connectivity
Test connectivity with the Windows machine. Remember to use the new 'eth1' interface when configuring the Kali network.
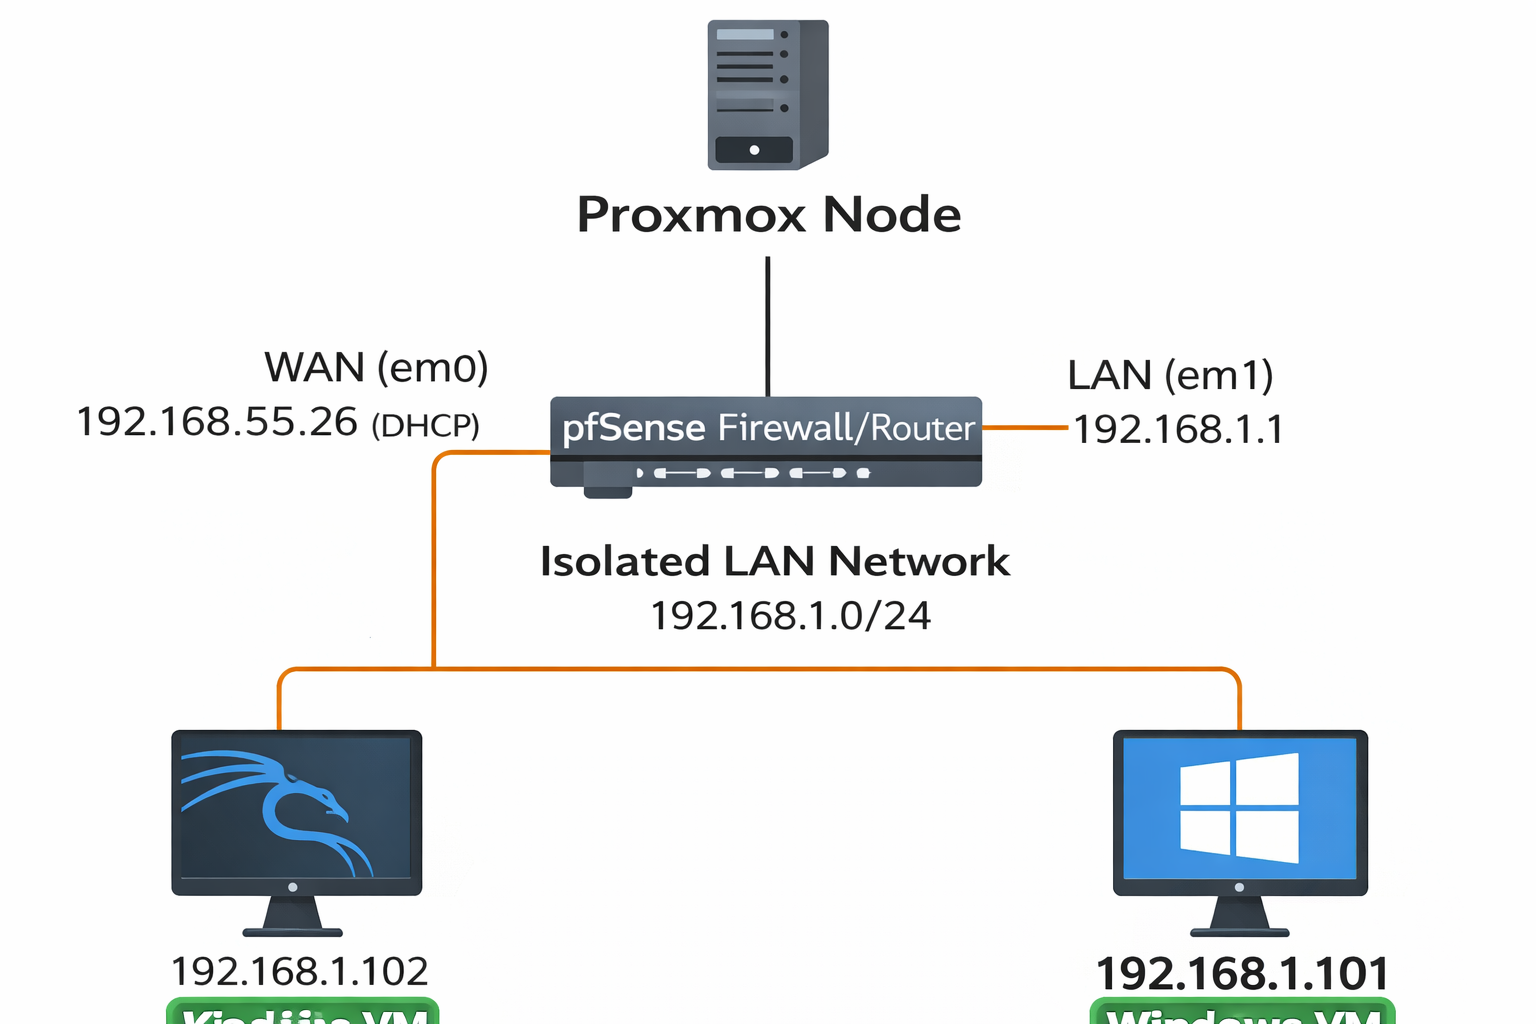
Proxmox pfSense Isolated Cybersecurity Lab
Setting up a complete cybersecurity environment using pfSense as a gateway for an isolated internal network.
Lab Topology
This is the topology we are building. The pfSense VM acts as a firewall/router between the Proxmox bridge (WAN) and the isolated 'internal1' network (LAN).
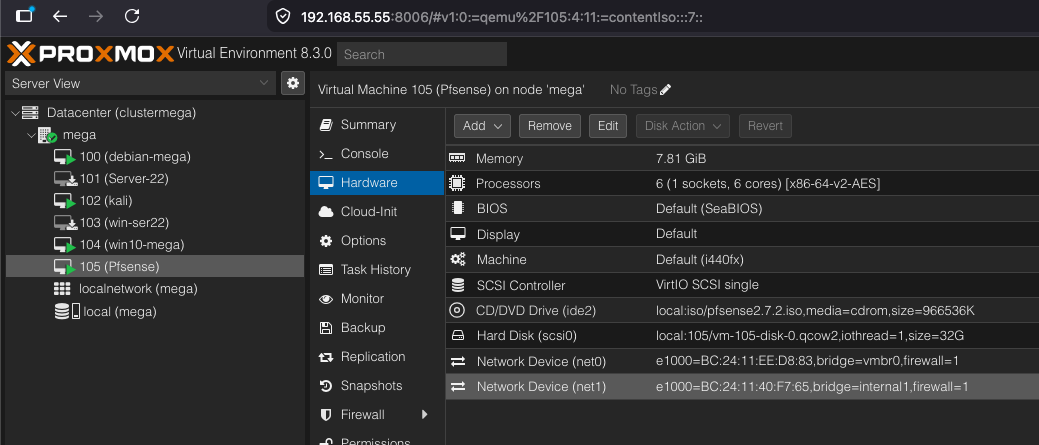
pfSense VM Configuration
To create the network, configure the pfSense VM with two network interfaces: one for WAN (connected to your main bridge) and one for LAN (connected to the 'internal1' bridge).
Install pfSense
Install pfSense using the default settings. For this lab, we only need basic router functionality to manage traffic between the interfaces.
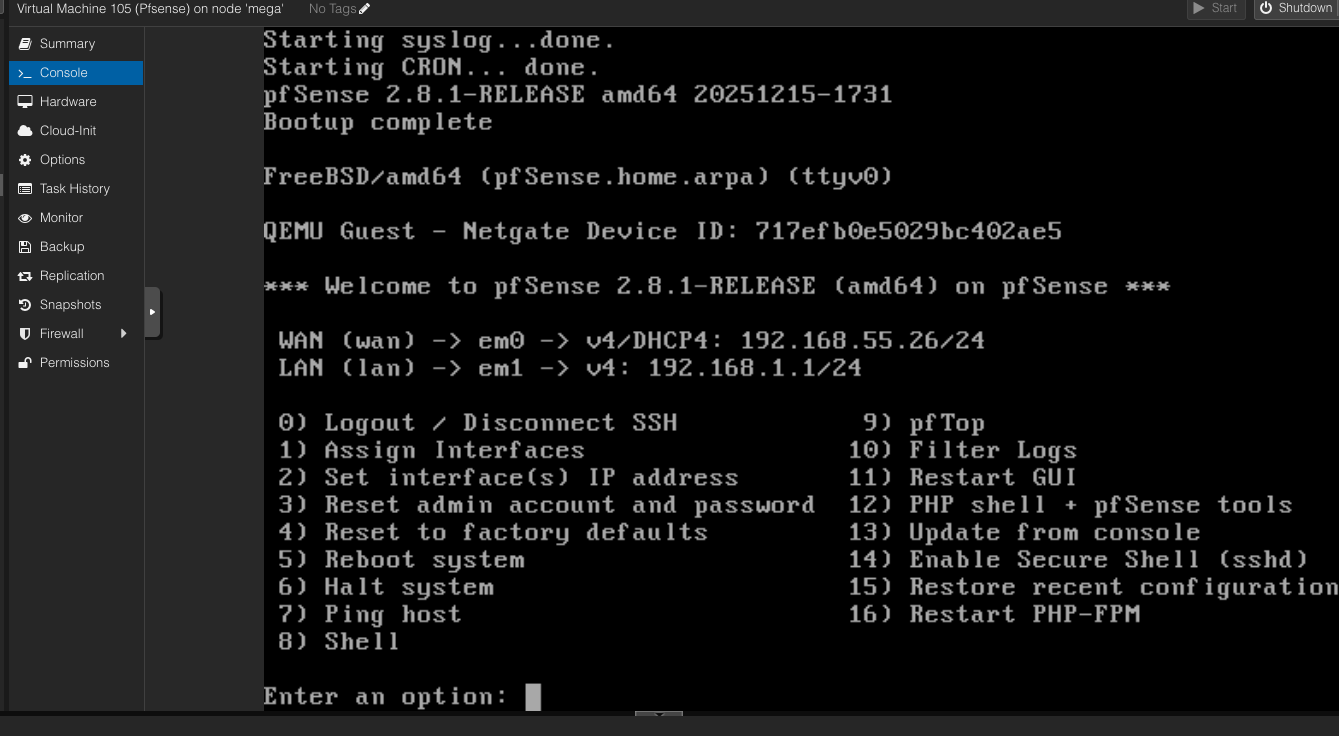
Verify DHCP and Network
Once pfSense is running, ensure all VMs in the lab are set to DHCP mode and connected to the 'internal1' network. They should automatically receive IP addresses from pfSense.
Connectivity & Kali Dual-Homing
With everything configured, the VMs should be able to communicate. In this setup, Kali Linux has two interfaces: one connected directly to the Proxmox bridge and another connected to pfSense.
Pro Tip: Keeping both interfaces on Kali allows direct access from your host machine (via eth0) while still being part of the isolated pfSense network (via eth1). Without the direct interface, the Kali machine would be isolated inside the pfSense network, making it harder to access from your main computer.
Ready, enjoy.