Instructions to install OpenVPN to operate on a gateway.
Project Highlights
This OpenVPN project documents a site-to-site style gateway
setup using OpenVPN Access Server. It focuses on automating installation, configuring the
server through the web UI, creating a VPN gateway user profile, enabling IPv4 forwarding,
and validating access to a remote lab subnet through the tunnel.
Automated OpenVPN Access Server installation with the ovpninst script.
Captured admin and client web UI access after installation.
Applied the OpenVPN license and configured server hostname, IP, and routing options.
Created a user profile with VPN gateway enabled.
Downloaded and deployed the client .ovpn profile for automatic connection.
Enabled IPv4 forwarding on the gateway client for subnet access.
Validated remote subnet reachability after the VPN tunnel came online.
Install the vpn with my script
There are several steps to install the server, we will use a script that has been taken from the web page in step one, and later we will configure it from the web browser.
1
ovpninst - The script was created from this page: https://openvpn.net/access-server/
❯ ovpninst
_________________________________________________________

Do you want to install OpenVPN Server? (y/n)

_________________________________________________________
y
Updating system and installing required packages...
Code Example with Copy Functionality
#!/bin/bash

# Clear the screen
clear

echo -e "\e[96m_________________________________________________________\e[0m"
echo ""
echo -e "\e[93mDo you want to install OpenVPN Server? (y/n)\e[0m"
echo ""
echo -e "\e[96m_________________________________________________________\e[0m"
read -p "" yn

case $yn in
    [Yy]* )
        echo -e "\e[92mUpdating system and installing required packages...\e[0m"
        apt update && apt -y install ca-certificates wget net-tools gnupg

        echo -e "\e[95mAdding the OpenVPN repository...\e[0m"
        wget https://as-repository.openvpn.net/as-repo-public.asc -qO /etc/apt/trusted.gpg.d/as-repository.asc
        echo "deb [arch=amd64 signed-by=/etc/apt/trusted.gpg.d/as-repository.asc] http://as-repository.openvpn.net/as/debian bookworm main" > /etc/apt/sources.list.d/openvpn-as-repo.list

        echo -e "\e[92mUpdating system and installing OpenVPN AS...\e[0m"
        apt update && apt -y install openvpn-as
        echo -e "\e[32mOpenVPN Server has been installed successfully.\e[0m"
        ;;
    [Nn]* )
        echo -e "\e[91mInstallation cancelled by user.\e[0m"
        ;;
    * )
        echo -e "\e[91mPlease answer yes or no.\e[0m"
        ;;
esac

echo -e "\e[96m_________________________________________________________\e[0m"
echo ""
echo -e "\e[95mADVISORY: This script should be used for authorized penetration testing and/or educational purposes only. Any misuse of this software will not be the responsibility of the author or of any other collaborator. Use it at your own computers and/or with the computer owner's permission.\e[0m"
echo ""
echo -e "\e[96m_________________________________________________________\e[0m"
2
After the install we will get the ADMIN
+++++++++++++++++++++++++++++++++++++++++++++++

Access Server 2.13.1 has been successfully installed in /usr/local/openvpn_as
Configuration log file has been written to /usr/local/openvpn_as/init.log


Access Server Web UIs are available here:
Admin  UI: https://192.168.140.132:943/admin
Client UI: https://192.168.140.132:943/
To login please use the "openvpn" account with "VDPDpE9u7GEF" password.
(password can be changed on Admin UI)
+++++++++++++++++++++++++++++++++++++++++++++++
3
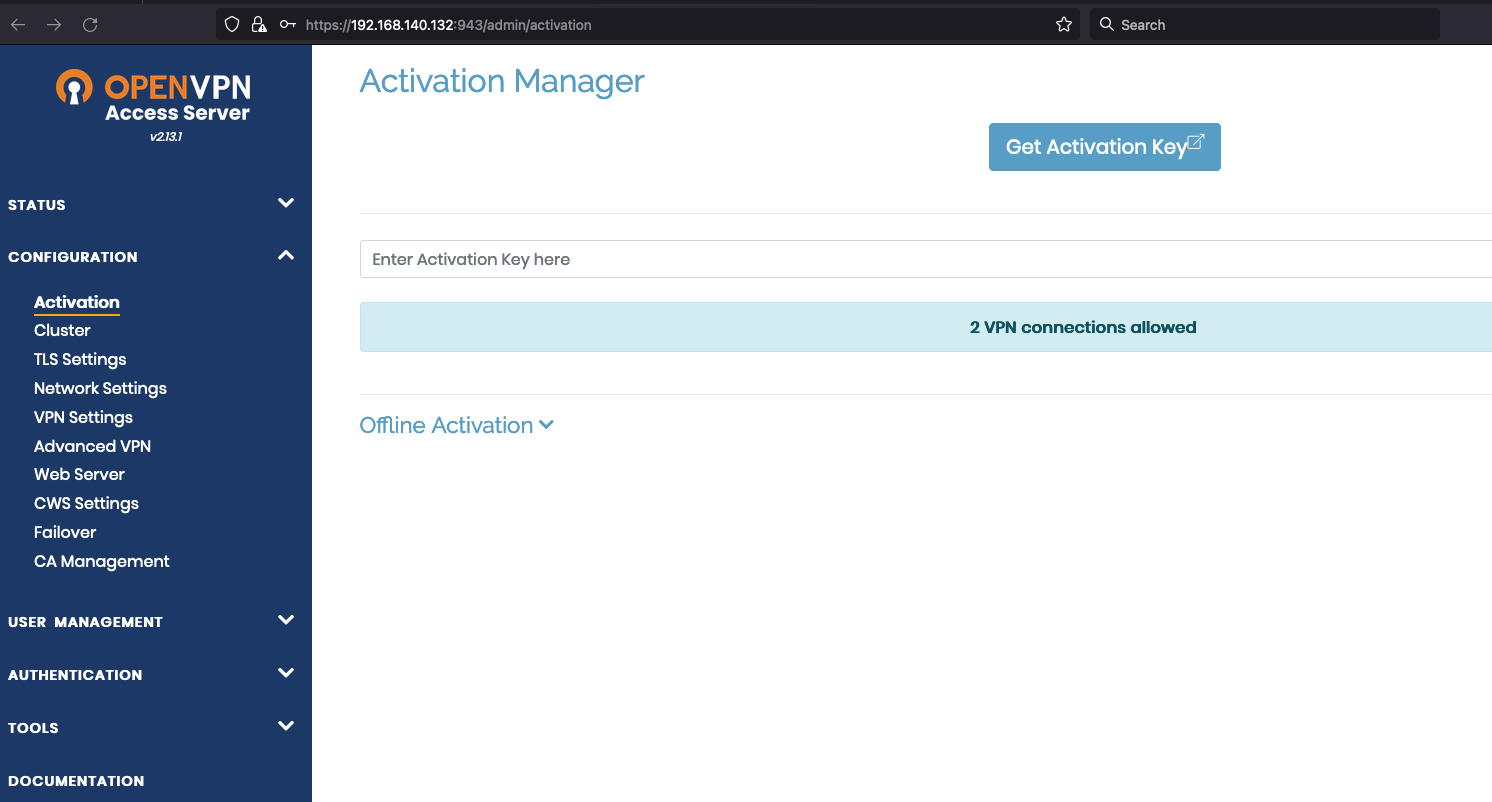
Go to the website http://openvpn.net to get a free licence
After obtaining the license it will be pasted on the first screen that the web server opens
4
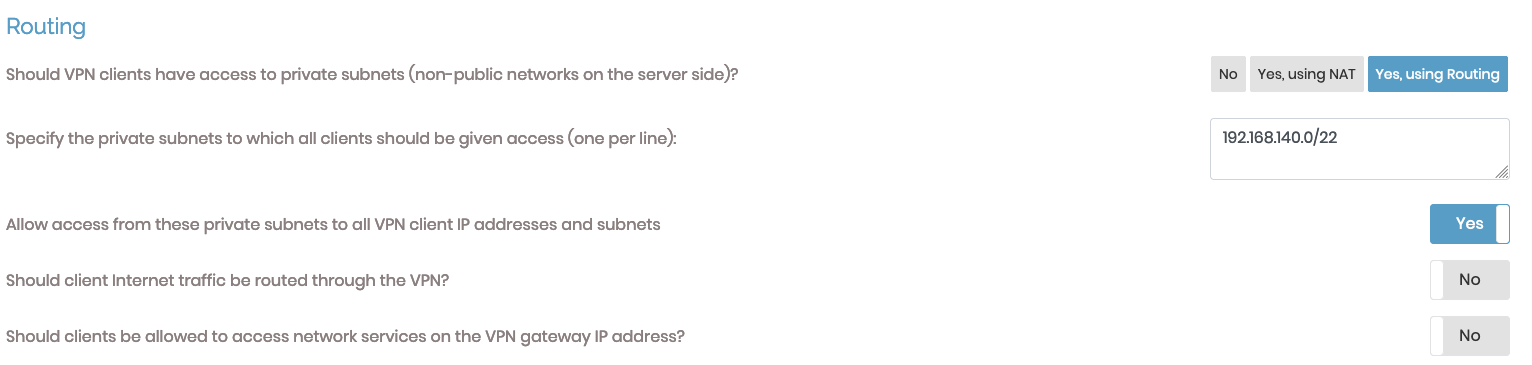
Configure VPN server on web browser
This part we check the interfaces and set a Hostname or IP address
Other Options available:
TOTP Multi-Factor Authentication
Time-Based One-Time Passwords (TOTP) are an additional authentication factor. Enabling this setting will require users to enroll once on the Client Web UI for multi-factor authentication and use the generated MFA codes in addition to their user credentials for subsequent logins. For SAML authenticated users the MFA requirement must not be enabled. The MFA requirement should be implemented on the SAML IDP instead. Multi-factor Authentication documentation is available on our website.
Web Server Certificate
Configure certificates/keys for the Access Server Web Server.
5
User Management
Add a new user with the VPN Gateway option yes
6
User Profiles
Create a new profile under the new user created and download the profile.ovpn file.
7
Modify the gateway client to forward IPv4
❯ sudo nano /etc/sysctl.conf


# Uncomment the next line to enable packet forwarding for IPv4
net.ipv4.ip_forward=1
8
Set up the client to autoconnect with openvpn
❯ sudo cp profile.ovpn /etc/openvpn/hq.conf
❯ systemctl enable openvpn
❯ ip a show dev tun0 | awk '/inet / {print $2}' | cut -d '/' -f 1

172.27.235.3
9
After restarting the machine, we should have access to subnet 140.
❯ ping 192.168.140.132
PING 192.168.140.132 (192.168.140.132) 56(84) bytes of data.
^C
--- 192.168.140.132 ping statistics ---
35 packets transmitted, 0 received, 100% packet loss, time 38525ms


#After the connection

❯ ping 192.168.140.132
PING 192.168.140.132 (192.168.140.132) 56(84) bytes of data.
64 bytes from 192.168.140.132: icmp_seq=105 ttl=64 time=1401 ms
^C