-
1. Installation
Register the package repository and install CrowdSec along with the Firewall Bouncer for nftables:
curl -s https://install.crowdsec.net | sudo sh sudo apt install crowdsec sudo apt install crowdsec-firewall-bouncer-nftables -
2. Verify SSH Collection
Check if the SSH collection is installed and active. If not, install it manually and restart the service:
sudo cscli collections list | grep ssh sudo cscli collections install crowdsecurity/sshd sudo systemctl restart crowdsec -
3. Configure Log Acquisition (SSH)
Configure the log acquisition for SSH and verify the configuration:
sudo nano /etc/crowdsec/acquis.d/ssh.yaml sudo grep -R . /etc/crowdsec/acquis* -
4. Restart and Reload
Reload the CrowdSec configuration to apply changes:
sudo systemctl reload crowdsec -
5. Validate Detection
Verify that CrowdSec is correctly detecting threats and displaying metrics:
sudo cscli metrics sudo cscli alerts list sudo cscli decisions list -
6. Monitor Logs in Real-time
Monitor the system and bouncer logs to ensure everything is functioning correctly:
sudo journalctl -u crowdsec -f sudo journalctl -u crowdsec-firewall-bouncer -f sudo tail -f /var/log/crowdsec.log -
7. Optional: Cleanup and Debugging
Use these commands to manage decisions and inspect specific alerts:
sudo cscli decisions delete --ipsudo cscli alerts inspect
Your system is now protected with SSH security and a firewall bouncer running on nftables.
Testing CrowdSec SSH Protection
Follow these steps to verify that your CrowdSec installation is correctly detecting and blocking SSH brute-force attacks.
-
1. Launch Attack (From Attacker Box)
Initiate an SSH brute-force attack using Hydra from an external or separate machine:
hydra -l nala -P rockyou.txt -t 4 -W 1 -I 192.168.88.108 ssh -
2. Watch Detection (On Target)
On the protected server, check the active alerts and decisions to see if the attack is detected:
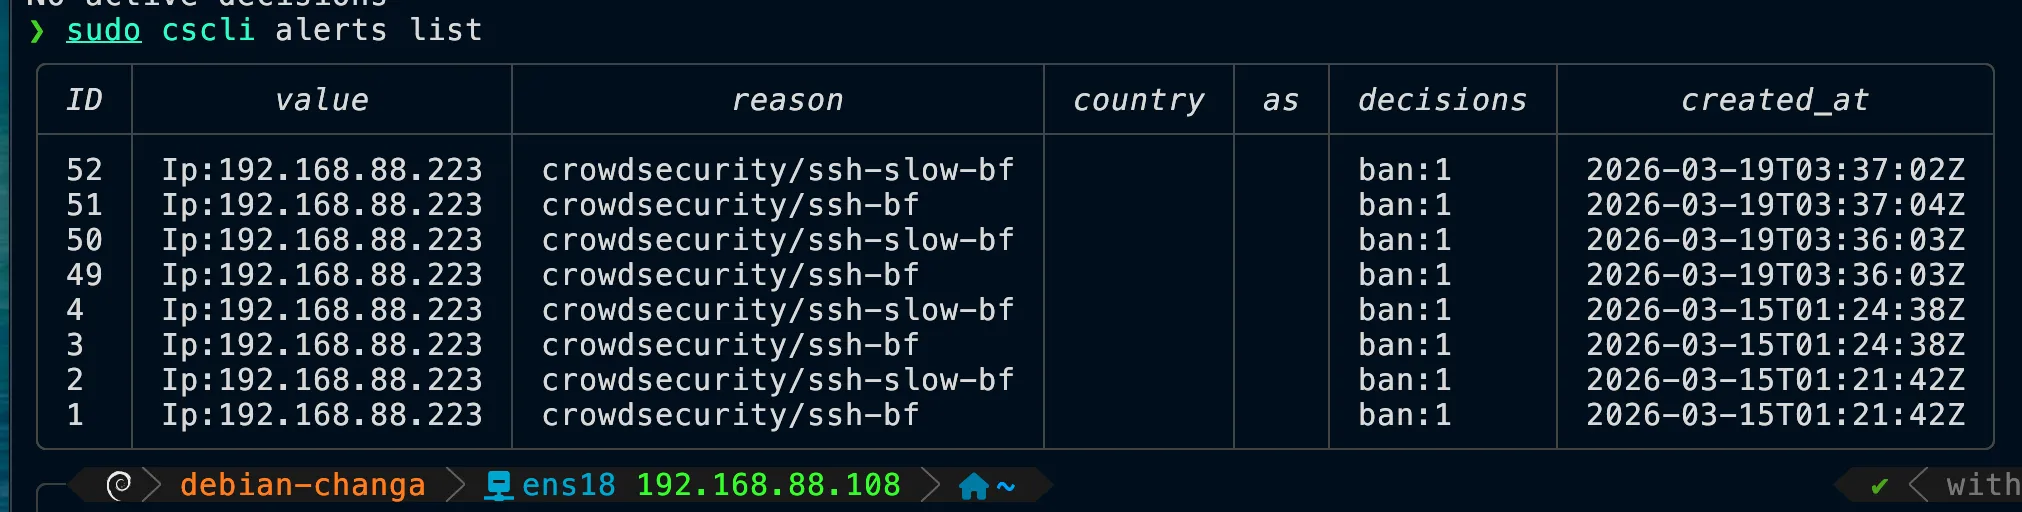
sudo cscli alerts list
sudo cscli decisions list
You should see alerts like
crowdsecurity/ssh-bforcrowdsecurity/ssh-slow-bf. -
3. Verify Block Behavior
From the attacker machine, verify that the IP has been banned by testing connectivity:
ping 192.168.88.108
nc -vz 192.168.88.108 22
Expected result:
pingshould time out (no replies), andncshould show "connection refused" or time out. -
4. Watch Live Blocking
Monitor the firewall bouncer logs in real-time to see the ban being applied:
sudo journalctl -u crowdsec-firewall-bouncer -f -
5. Remove Ban (For Retesting)
To unblock the attacker IP and perform another test, delete the decision manually:
sudo cscli decisions delete --ip 192.168.88.223
Ban Duration Configuration
You can customize how long an IP remains banned by modifying the CrowdSec profiles.
/etc/crowdsec/profiles.yaml
# Look for the decisions section and modify the duration:
decisions:
  - type: ban
    duration: 4h
After changing the duration (e.g., to 1h, 24h, etc.), restart CrowdSec:
sudo systemctl restart crowdsec